How to Format Blender Products
These are the requirements I would like the publishers to follow when uploading new products. I have perfected the method along the years that I've been selling in my shop, and I find it to be very effective with search engines, give a very professional look, and make the customers feel reassured that there is a great quality standard in place.
I would love for all the publishers to follow this requirements precisely, but I understand that there are cases where this is just not possible due to time and a large amount of assets, so there be the case, it's okay to skip some steps, or to do things you own personal way. This shop is meant to be a happy place for everyone, so no worries if you don't wish to follow the guidelines to the letter 😇
But please try 🌸✨
🔷 If adopting this method is too inconvenient for you, I can do it in your place, but I would ask in exchange a 10% of your product sales instead of the standard 5%. How about it? Let me know if you are interested 😙
FIRST STEP - Rename the textures
Name the textures always with the same structure. They should be something like SM5-full-detailed-name-X, where X is the type of image. For the image type name, there should be consistency and always use the following:
- albedo
- metallic
- roughness
- mask (if it's a mask for mixing materials)
- opacity
- specular
- scattering (for SSS materials)
- emission
- height
- displ
- normal-opengl (or normal-directx)
- translucent
Here's an example of how it should look:

You can exchange the SM5- for any capital letters that you wish if you want to distinguish your own brand, but I recommend it to be short. For example, RW- (for Richard Wren) or U3D- (for Unreality3D), something like that 👍
Make sure that the color textures are all PNG with 8 bit. For B/W maps (like roughness, specular, etc.) PNG in grayscale 8 bit, and for the heightmaps/displacement maps TIF with 16 bits.
Put all the images together inside the folder named "Images", inside the folder named like the Product Name, like:

SECOND STEP - Add the object to the scene and scale it
Once you've adjusted the texture names, open the startup Blender file and import the model. Make sure that it is in real word scale. You can use the Transhuman figure as reference, this way it's easier to make things like tables and chairs the right height.
Once you are done with the scale, apply it with (ctrl+A - All transforms) ⚠️ very important, and delete the Transhuman.
Please, add a subdivision surface modifier so it can be used with Cycles render in Blender as well as for video games. If the model needs displacement, use the Geometry Nodes modifier included in the file, and set it up like this:

THIRD STEP - Add materials and name them
There is a material already created called "Material" that can be added to the model for a faster setup. It's just a Principled Shader with a texture image selector.
Set up the material in a clean way, like this:

And call each material for what they are, with capitalized first letters, followed by the suffix "Material", for example: White Clay Material, Rotten Wood Material, etc...
If there are multiple color variations, you can either make copies of the model and distribute them around in an appealing way, like this:

Or you can make several groups in the material, like in the following example:
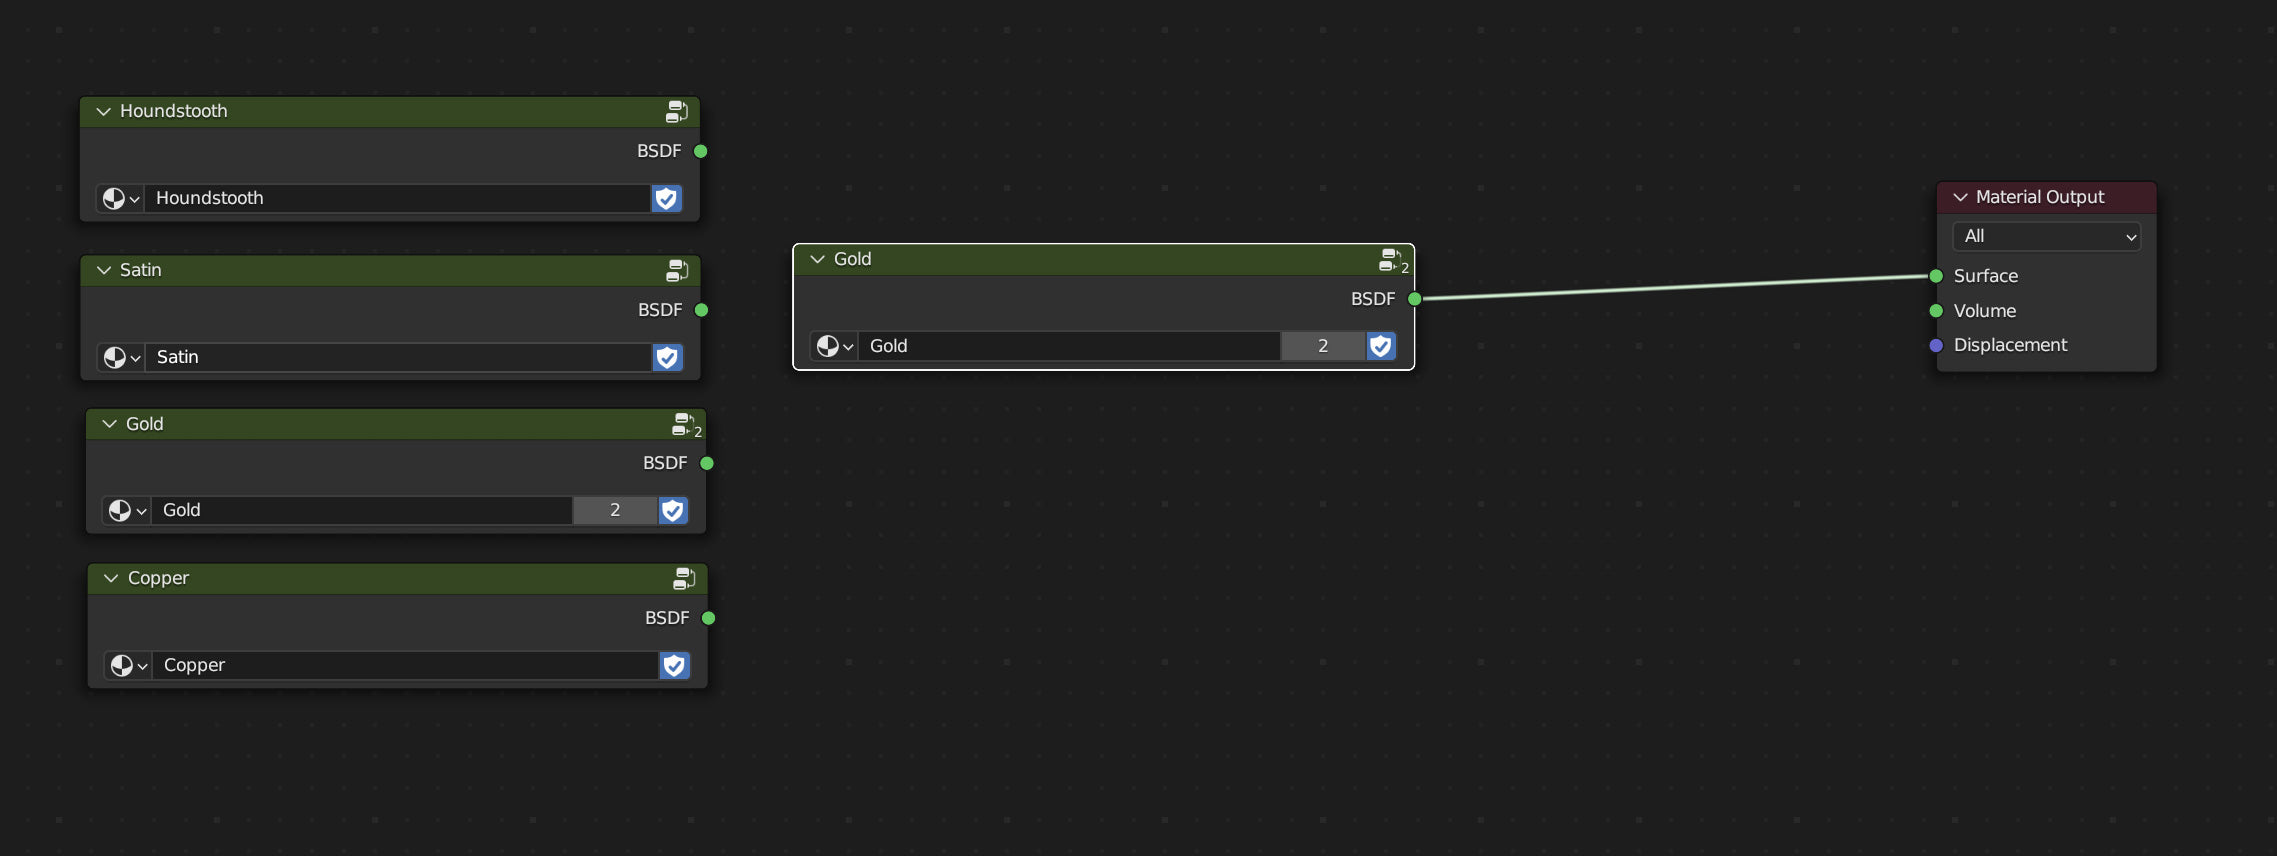
Please, don't forget to make one group for each variation plus the group that is actually being used, to avoid any option that is not being used to be purged/deleted from the Blender file when you save and close the file (or to give each group a Fake User)
FOURTH STEP - Take renders and optimize them for web
Take beautiful renders in Cycles! 💖✨
The scene comes with a HDRI called "mondarrain_3", that gives a very good sunlight illumination that also creates very pleasant blue shadows.
The Blender compositor comes setup with the shadow catcher already connected. The resulting render should have a white-ish background. For some special views that require more contrast, you can swap the white background (#F7F7F7) for the dark gray (#333333)
Save the images as JPEG, (if you can, optimize them for the web so they are as small as possible 🙏), and name them without spaces, beginning the name with the code SM5- or your own brand initials, and give a name that describes the image, no spaces, separated with -, for example:
- SM5-mandarine-3d-model-scan-blender-obj-top-view
- SM5-fishtail-braid-bun-curly-hairdo-3d-model-blender-obj
- SM5-antique-porcelain-basin-3d-model-clean-topology-UVs
- etc...
👆 All this is good for being found in search results, so be mindful of doing it very well 🤗
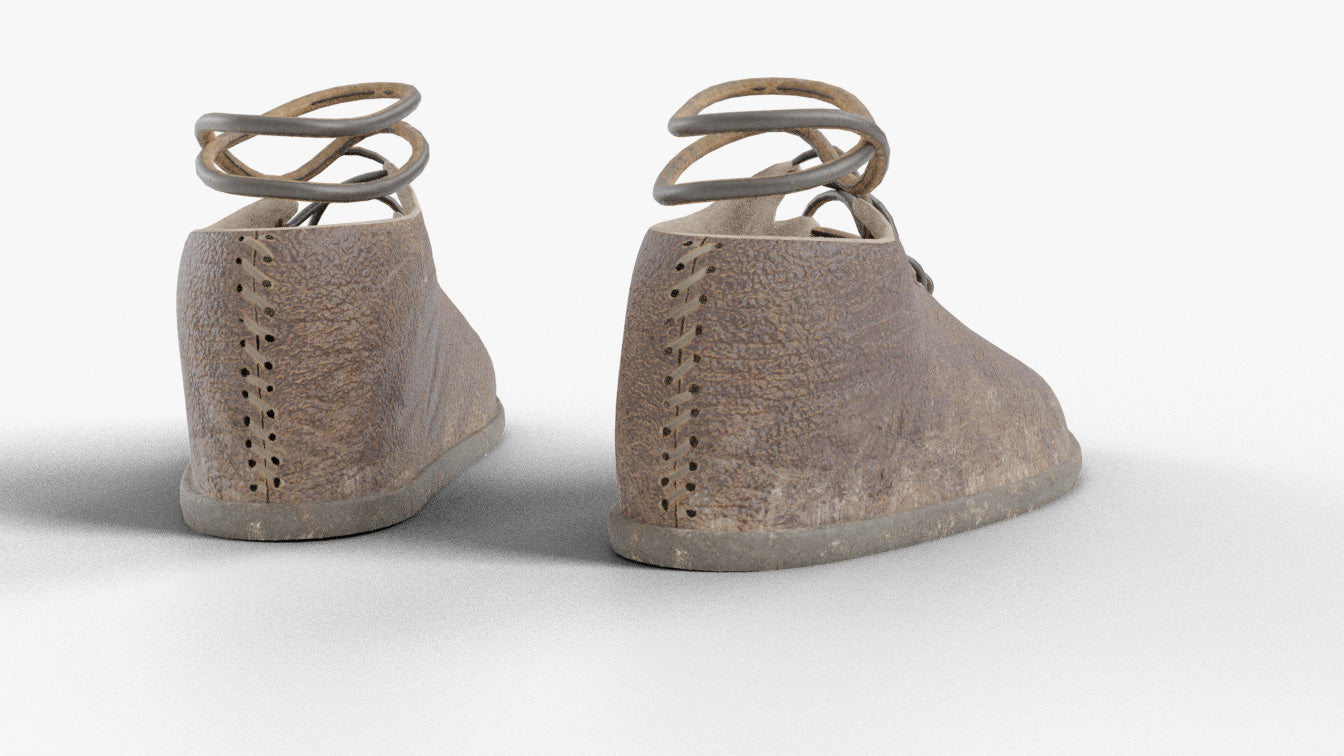
Make sure to take beautiful renders (framing the object on the space with a good photographic eye in mind) of every side (top and bottom as well), especially if here is some mistake or flaw in the model, make sure to add a render of that too, so we get no angry customers. In this model, for example, the back looks very bad, and I made sure to include it in the sample images, so there would be no nasty surprises later 👇
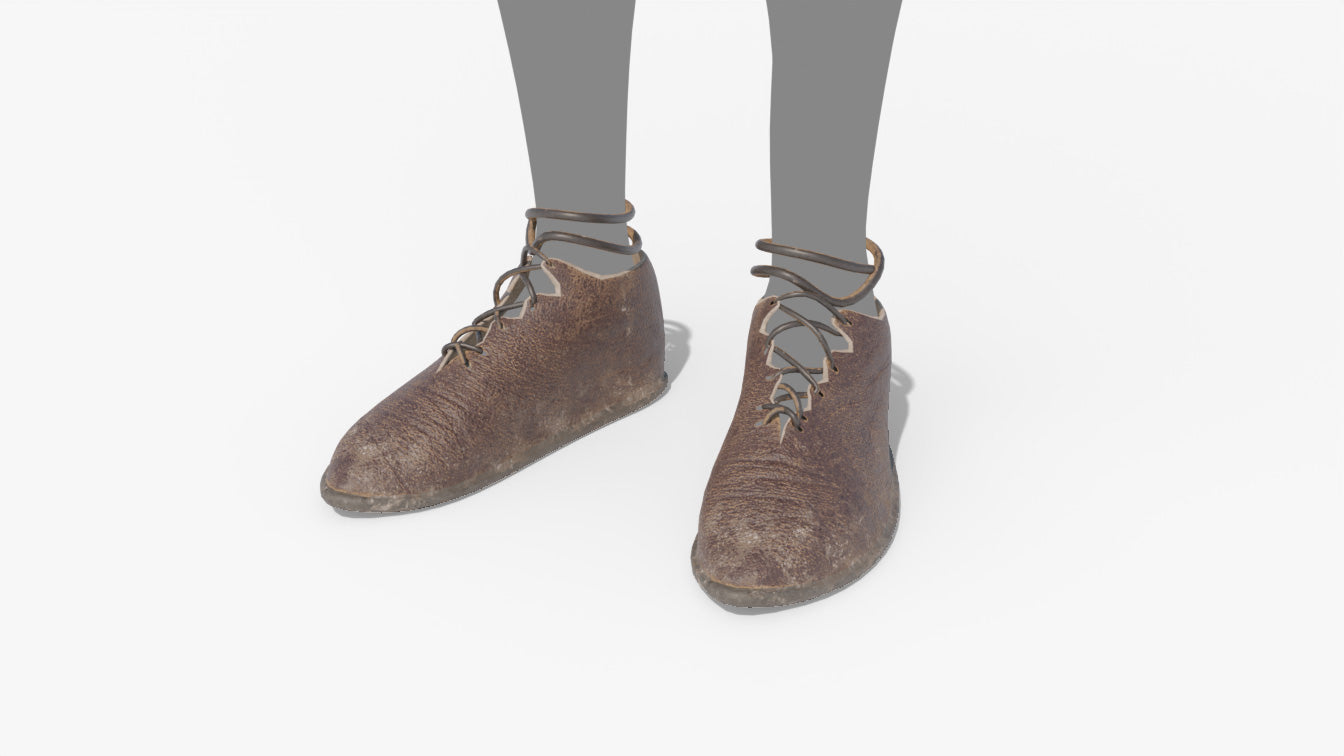
Make sure to also take a neutral, whole render of the object to be the featured image of the product page, with the #F7F7F7 background, like:
FIFTH STEP - Organize and clean the scene
Last step, you must tidy up the scene.
Name the objects with a clean, meaningful name, starting with the SM5 code (or your own), every first letter capitalized, for example:
- SM5 Rest Pose Transhuman
Make sure to name the object as well as the mesh datablock with the same name:

Add a New Collection and name it the same as the object, or in the case of several objects, give it a name that is good for all of them, like:
- SM5 Wooden Plates Set
- SM5 Wooden Soup Plate
- SM5 Wooden Dessert Plate
- SM5 Wooden Tray
- etc.

Select the collection and right-click it, and Mark it as an Asset. You can do this for individual objects inside that collection too.
In the Asset tab, add an Author Name (SM5 by Heledahn, or your own name/brand) and select the featured render as the asset image. This is great for finding the model in the Asset browser, and it looks super professional ✨

Important ⚠️Go to the Shading Tab, and in the World section, change the HDRI image "mondarrain_3" for our own "SM5-HDRI-2". We can't distribute models with images that aren't ours.
Finally, go to the Blender File tab in the Outliner, and check that:
- There are no duplicates
- All the names are correct and there are no meshes without name
- Right-click and delete "mondarrain_3" and "SM5 Rest Pose Transhuman", and the "SM5 Subdivision & Displ" geometry nodes (if it's not being used) and any other mesh, camera, light, or prop that doesn't belong in the product. Please don't delete the Shadow Catcher, so it can be used by our clients if they want to.

After you clean up the file, put the outliner back in View Layer.

As a last step, go to File - Clean Up - and select Unused Data-Blocks, and Recursive Unused Data-Blocks to purge the scene from anything extra that doesn't belong.

Then go to File - External Data, and choose Make Paths Relative, to make sure that all the images point at the images in the Image folder of the product.
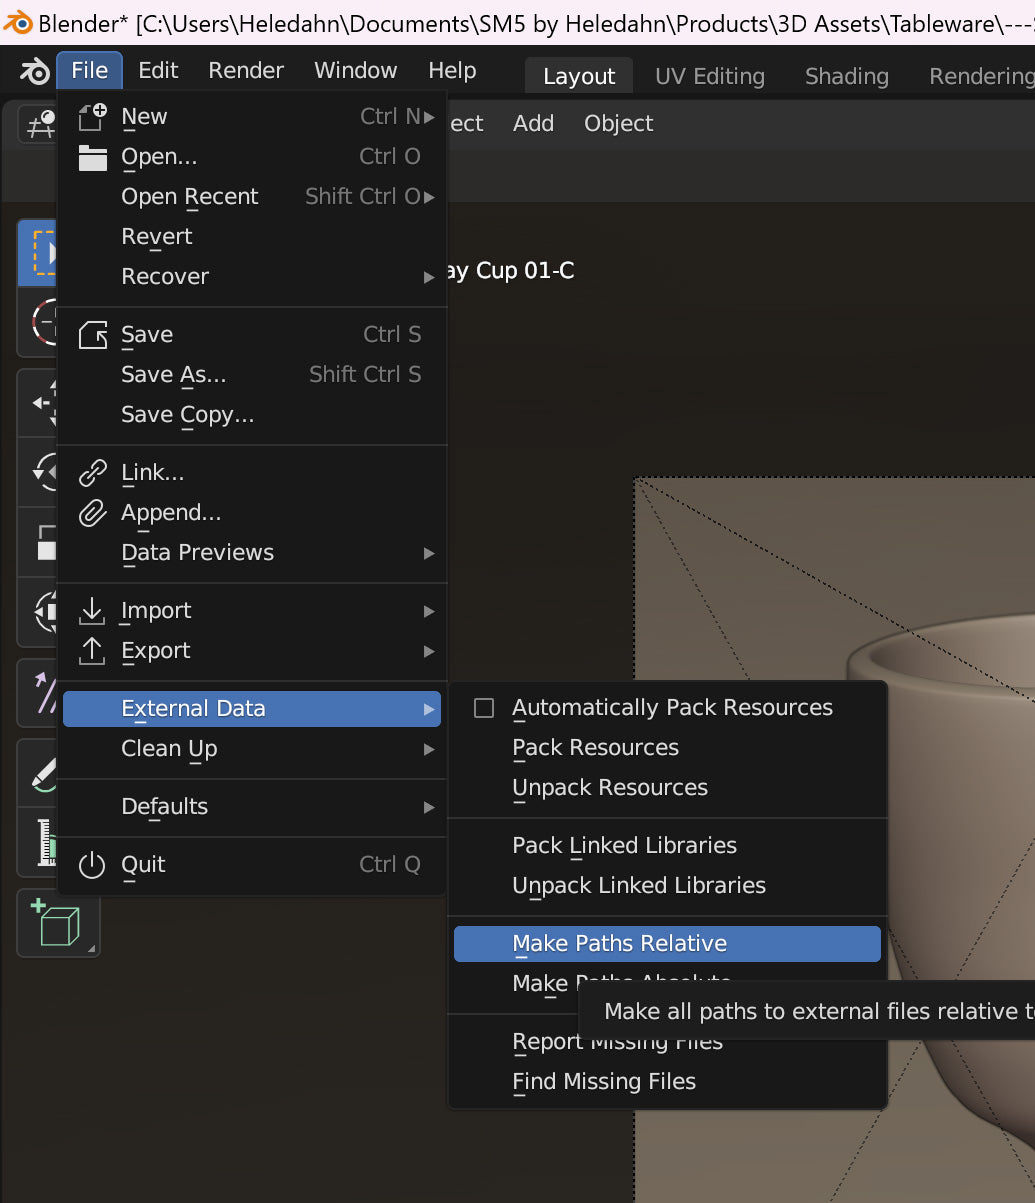
Save the Blender with the same name as the Object Collection, in the Product folder, at the same level as the Images folder, like:

And make sure to save the file in the Layout tab, with the camera framing the model in the same position as the Featured Render image, like:

SIXTH STEP - Export other formats
Optional, but recommended. Export your model to GLB and FBX with their textures embedded in each file at lower resolution. Put each of them in a individual .zip folder with the proper name, like:

- SM5-Product-Name-BLENDER
- SM5-Product-Name-GLB
- SM5-Product-Name-FBX
The GLB can be uploaded in the Shopify product page to be examined by the clients, like if it was the Sketchfab viewer. BUT, it can be easily stolen 👮♀️(they can download it from the browser cache, it's apparently very easy), so this is a risk you must decide if you are willing to take.
In my opinion, I would say, "let's do it!" and trust that the people visiting our shop are good people, but it's up to you.
Then, make a .zip file with the Blender file, the Documentation, and the Images folder together, like:

SEVENTH STEP - Make a product in Shopify
Go to the Product tab in Shopify and either select a product that is in the same category and duplicate it.
Write the initial description, try to make it short. If the description is too long and you want it to be expandable with a Features tab, go to the HTML view and add the extra description after the <!--split--> tag, like:

Then, add the rendered images (please include one image of the textures included in the Images folder, and another image of the UVs and topology view.)


After adding all the images, you might wanna consider writing an alt description for some of them. This helps people with impaired vision, but is also great for boosting the search results to show your images. You don't have to do it for all the images, just the renders that look most beautiful. Write something like:

"3D model of an ancient earing loop. It's made of antique gold and has a simple design with geometrical patterns along the loop. The model has low polycount and PBR shading, perfect for games"
You can copy/paste the text and change it to fit each render, like "3D model of an ancient earing loop viewed from the top... etc...
If you add the GLB file, the 3D model will appear as one of the product images, and the clients can see it like as if it was a Sketchfab viewer. They might steal it, so be mindful of this.
👉 Add a price.
👉 An SKU, with a name like: SM5-ancient-gold-earing-small-hoop
On the side column, add your brand / author name (Vendor)
👉 Add your model to a collection. If it doesn't exist, make one, or ask me to do it for you.
👉 Add tags (capitalize words here too please, I seem to have an OCD 😂)
And then, in the product metafields at the bottom, in the Details, carefully add the information directly into the code. If it's too hard, you can use the Blogpost Caroussel and Shop, and edit the table directly in the editor, and then copy the HTML of the table and paste it in the Details tab of your product.
If you want to use the previously mentioned <!--split-->, select True in the Collapsible Description
And if you wish to upload your model to Sketchfab instead of adding a GBL in the product media, you would paste the embed code in the Model Inspector box.
Lastly, check the Search Engine listing, and make sure that the title is good and includes as much info as possible, like:
- Ancient Golden Earing Small Hoop - 3D Model | Game Asset | GLB |
See that the meta description is the same as the product description, but even shorter if needed. Check the character max to make it perfect.
And see that the link name is good with the title and the description. If everything has been done properly, your product should soon appear in the search results and bring us many happy sales! 🥳🍾🥂
👉👉 Don't forget to add the .zip files into the product! 👈👈
Go to the top of the Product edit page, under More Options - Add digital file.
Here, you should add all the .zip files you've prepared. Once they upload, click Save.
If you want to update the files, delete the old ones first. Shopify will notify your customers that the files has been updated.
🎉That's it! Congratulations on publishing your models successfully!🎊
It might seem like it's too much, but once you get it, you will do it automatically.
Uploading each product takes a while. I usually take a minimum of 30 minutes per model... it's very boring. 😖
That's why I offer to do it for you, if you like. Or you can do it your own way. This shop is a happy shop. But please try to do it neat and consistent 🌹. That's all I ask 🥰
Thanks for reading!
