|| Documentation ||
About
Transhuman4Blender is a Blender addon designed to create a wide variety of realistic 3D characters quickly, and animate them using motion capture (like Mixamo, etc.)
For support use our Transhuman4Blender Discord channel
The Transhuman4Blender addon panel is located in:
3D Viewport → right Sidebar (N) → Transhuman4Blender Tab.
Features & Limitations
Features
- Create realistic characters in Blender with ease using sliders and color picks 🎚️
- Add custom/imported base meshes, skins and displacements for extra flexibility
- Add tattoos, scars, and other skin effects 🧟
- Add makeup, nail polish, missing teeth, eye conditions, visible veins...
- Use the randomizer to create/discover new faces ✨
- Use 'Conception' to mix two Transhumans into one 👶
- Make unique hair colors with roots and highlights
- Turn all the hair to mesh for a real-time Transhuman! ⏱️
- Mesh hairs retain grooming capabilities and it's non-destructive! 💇
- Save your presets and load them at any time 💾
- Animate your character with mocap, or simply pose them by hand 💃🏽
- Includes Dynamic Wrinkles and Dynamic Breasts
- Have fun with the NSFW features (adults only) 🌶️
Limitations
- Tested only in Blender 3.6.0. Other versions may not work correctly.
- Previews require a powerful computer 💪
- Depending on your specs render time might be slow 🐢
- Must bake all materials if you want to export Transhuman 📦
- Preview in Eevee might show up as pink if too many options are selected
Installation & Updating
Installation
Go to Edit → User Preferences → Add-ons tab and press the 'Install' button in the top bar, and select the (previously downloaded) Transhuman4Blender.zip file.
Activate the plugin clicking in the checkbox ☑️
![]()
Updating
Update Transhuman4Blender by uninstalling the plugin, and installing the newer version following the instructions above.
Presets
In the presets panel you can either SAVE or LOAD your unique Transhuman for future uses.
To SAVE a preset, write a unique name and click 'SAVE'.
![]()
To LOAD a preset, click the dropdown, select the preset name, and click 'LOAD'
![]()
There are 11 default presets included in the addon: ZERO, F1 to 5, and M1 to 5.
![]()
![]()
Presets are stored in the addon folder (example: C:\Program Files\Blender Foundation\Blender 3.6\3.6\scripts\addons\transhuman_4_blender\presets).
You can delete the presets that you don't need by accessing the addon folder and deleting them.
![]()
⚠️ We recommend NOT DELETING Transhuman_PRESET_SM5_ZERO, since it's needed to easily start a fresh Transhuman
Armatures
In the 'Armatures' panel you can hide the armatures from view, activate a proportions checker, switch between the regular Mixamo armature (for FK animation or motion capture data), and the IK/FK Mixamo Rig for manual posing (needs the free Mixamo plugin for enhanced usage), and add the Toes rig option.
![]()
For the face animation you can choose between the Face rig, or Mocap mode.
Proportions Check
With the 'Check Proportions' option you can enable a grid to use as a guide to ensure your character's face design is within realistic ideals.
![]()
Mixamo Rig
The Mixamo Rig is great to use with mocap animation, as well as for simple FK posing.
To pose your Transhuman, simply enter 'Pose mode' and set the pose you'd like your character to adopt. You can also choose a pose from the Animation Assets Library, or select a pose from the Animation side menu.


To add mocap data, select the Armature, go to Animation tab → Select Non-linear Animation → Copy/paste the animation data in the 'Transhuman Armature - MOCAP HERE'
[TO DO: VIDEO OF MOCAP]
IK/FK
Switch to the IK/FK option for manual animation/posing. The rig, as a default, comes in IK mode, and it can be used 'as is', but to further enhance the usage, we recommend installing the free Mixamo Rig plugin (you can find it here).
With the Mixamo Plugin you can switch between IK and FK, and you can also transfer mocap animations from the regular Mixamo armature to the IK/FK Armature. This option is great for animation editing, as you can see in the video below.
[TO DO: VIDEO IK/FK, animation transfer and animation cleaning]
Face Rig / Mocap
Transhuman4Blender can be animated using Apple's facial shape keys, that can be controlled with an IPhone and an external mocap service (any mocap solution that works with Apple facial keys will do).
To animate your Transhuman's face, select you character's mesh and go to Animation tab → Select Non-linear Animation → Copy/paste the animation data in the 'Transhuman - FACE MOCAP HERE'
[TO DO: VIDEO OF MOCAP]
If you wish to have your character in a static pose, you can choose the option Face Rig. The Face Rig controls the Apple shape keys to work driven by bones. When the Face Rig option is selected, the Mocap data (if any) will be overwritten by the rig drivers.
To pose the face, select the Face Rig, enter Pose mode, and move the bones following the chart below. You can also use premade poses from the Pose Asset Library as well.
[TO DO: FACE RIG CHART]
[TO DO: VIDEO OF FACE POSING and asset usage]
Toes
To add extra dynamism to your poses, you can pose/animate the toes! You can even save the poses in the Animation Asset Library for easier reuse.
Eye Color
![]()
Iris
There are four base eye colors to choose from: Blue, Green, Amber, and Brown.

You can use these colors as they are, or lighten/darken them, pick a custom color, or add a halo.
There are several finishes you can achieve by manipulating the Redness, the Cornea Roughness, and the Cornea Reflectivity (great for increasing beauty reflections in the rendered eyes)
![]()
The Iris size and the Pupil can be increased or decreased, either for aesthetic reasons or to add an extra layer of dynamism to your animations.
You can also change the pupil type to Cat, Goat, or Star (the later works best with an open pupil)
![]()
Cornea / Sclera
You can achieve eye damage/blindness effect by adding a white tint to either the 'Right Cornea' or 'Left Cornea', or to 'Both Cornea', and reducing the Transmission slightly.
To make shinny black alien eyes, add 100% black tint to 'Both Cornea'
To make eye tattoo effects, chose the tint amount and color of your liking and write either 'Right Sclera', 'Left Sclera' or 'Both Sclera'
![]()
Tears
The tears can be also colored, for various effects.
Skin Settings
Skin Settings
You can change the hue of the skin, the saturation, the lightness or darkness. You can increase the Subdermal colors to achieve a sickness effect. You can also control how the skin details and anatomical details appear, as well as the shininess and reflectivity of the skin.
![]()
The Subdermal map can be Simple (just veins and redness) or Adaptive. Adaptive mode will automatically add blue, red and yellow hues depending on the anatomy of the Transhuman's body (crests and cavities), adding an extra depth to the skin.

Scars and Tattoos
Transhuman4Blender can add and utilize a wide variety of skin decorations and skin conditions, that can be loaded and applied under the 'Scars' section of the SKIN SETTINGS Panel.
As a default, Transhuman4Blender comes with two decorations: SM5 Freckles 1 Scars and SM5 Sexy Scars.


We have several more decorations, scars and tattoos available in the Transhuman page. To add them into your Transhuman file, simply import the images (for Tattoos) or the Scar material group, and select it from the dropdown.
💡 In order to appear in the dropdown properly, all skin conditions and decorations must be labeled with the 'Scars' suffix.
You can activate Scars and Tattoos, and manipulate how they appear, to add extra details to your Transhuman's skin.
![]()
You can blend the scars, increase the bump, increase the color intensity and the brightness.
You can also load your own tattoo image texture, or paint directly into the included tattoo image.
Appearance - FACE
In the APPEARANCE - FACE section you'll find many subsections full of sliders, that will allow you to achieve any face you can imagine.

The Base section features 5 female face shapes and 5 male face shapes. These face shapes are representative of different ethnicities, and all have unique features that make them memorable.

You can choose to use these faces as they are, or use them to add just a touch of uniqueness to your creation. You can also mix and match, no matter the gender or the column they're set in. They all blend perfectly and add a layer of complexity to your Transhumans!

In the Face section you'll find many options to customize the overall shape of your Transhuman's face, the size of the face/head, the curvature of the profile, etc.

In the Cheeks section you can control the amount of protrusion of the cheekbones, as well as adding hollowness.


In the Chin section, you'll find all the options for shaping your character's chin.


The Jaw section control the thickness of the jaw, as well as the protrusion of the jaw bones.

The Neck section has options for controlling the girth of the neck, but also the shape of the jowl.

The Eyes section has a wide range of options, from size, rotation, spacing, to controlling the shape of the tear duct. In this section you can also control the position of the eyeball by itself, in case it becomes misplaced by the sum of the other sliders.


The Brow section deals with the eyebrows position and shape. It's useful to add character, or to modify the eyebrow shape without having to edit/groom the hair curves themselves.


The Nose section has many option, and they are great to achieve any nose shape imaginable by controlling the glabella, the bridge, the supratip, the tip and the wings shapes/rotations/positions.


In the Lips section you have all the sliders needed to fill, thin, and reposition the mouth of your Transhuman. You can also modify the shape by playing with the tubercles, clefts, and creases.


The Ear section offers options to change the position and size of the ears (using it with the Anatomy Checker is a great way of achieving a correct anatomy and facial proportion.) You can also add pointy ears to your Transhuman!


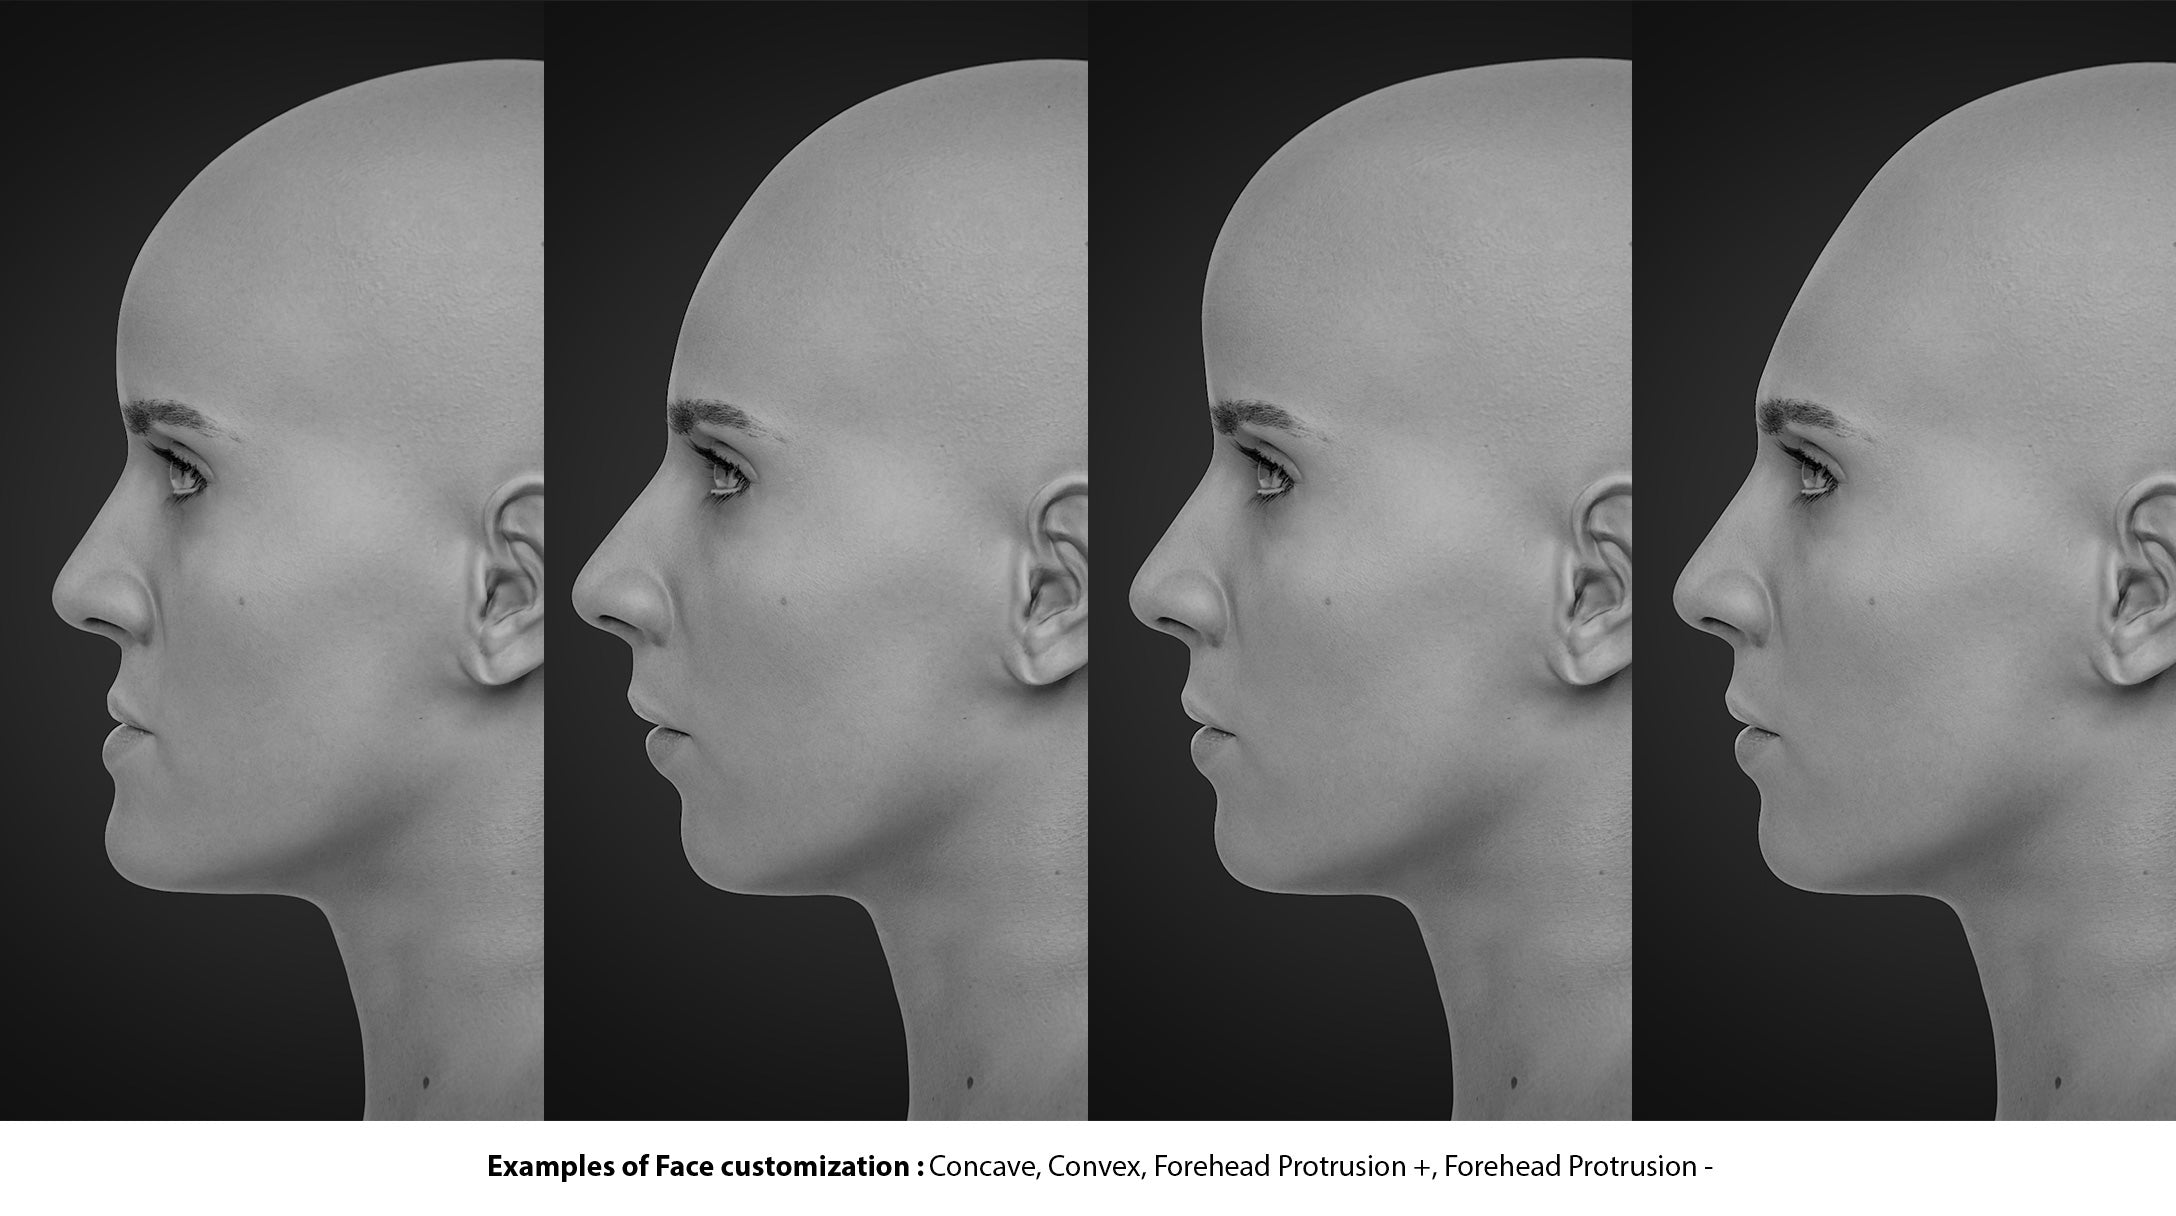
Face Examples
![]()
Remember
💡 The sliders that feature the symbol ± have a range from -1 to 1, while the sliders with no symbol, or the symbol + have a range of 0 to 1.
Randomizer
In the MODIFIERS panel below there's an option to randomize all the face values to achieve a tremendous amount of variations with just a few clicks! 👀
(See the Modifiers section for more details)
Appearance - BODY
As a default, Transhuman4Blender displays a body that is meant to be genderless, and has a complexion intended to be of no ethnicity.
To create the basic shape, we averaged the bodies of 10 women and 10 men of various ethnicities and body types. The averaged result was ZERO.

ZERO is a blank canvas in which you can project any person or idea you might have, and watch it come alive with the power of Blender.
After modifying the eyes and skin colors, and designing the perfect face for your Transhuman, is time to make the right body to go with it.
The first thing we are asked in the Body panel is to choose a base for the body.

The bases are separated into Female (F) and Male (M), but all the shapes are interchangeable (more on that later).
Begin by selecting the gender of your Transhuman. A number of 1 means 100% influence.


You can either go for 100% influence, or try with lesser amounts to achieve other interesting body types.
Then, you can add or remove weight, or make them muscular, or all at once!
No matter what you choose, the body will always look good. The gender you choose for the base also doesn't matter, in the sense that you can at any time add from the opposite gender, and the result will still look great as long as you keep the sum of all values between 1 to 1.5 (higher values might produce results that are too extreme or cartoonish).

Adding Age will add a layer of wrinkles to the face and soft sagging to the whole body, as well as color the skin with freckles and natural stains to evoke older skin.

Once you have decided the overall shape, you can finetune it with the second set of sliders, to manipulate the Breasts, the Waist, the Hips, and the Shoulders.
 Last step is to select a unique shape of Hands and Feet. Here you can lean for a more masculine/feminine proportion ration, elder, neutral, or increase the length of the nails.


Gender Definition Ratio (Optional)
There is an option, at the bottom of the BODY panel, that you might want to check in the event that your Transhuman's anatomy does not look 100% like you expected.
The adding and removing of mass, as well as the mix between gender specific shapes is automatically calculated by the plugin depending on your choices. But it can happen, in some cases, that the ratio doesn't match your vision.
In this panel, you can help the plugin define the features of the Transhuman's gender by moving the slider towards the F (for a female effect) or towards the M (for a Male effect).

👍 It is recommended to check the final body in render preview mode with a Subdivision level of 1 or 2, to make sure the anatomy looks correct. If it doesn't, adjusting the Gender Definition Ratio will help with artifacts and strange anatomical features.
💡 Don't be afraid to mix shapes from both Female and Male columns. The final gender will be determined by the Gender Definition Ratio, so it's very useful to add muscles, weight +, or weight - from the Male column into a Female character, and vice versa, to achieve a specific body type.
Persona (Addon)
Transhuman4Blender is capable of creating any character you can think of, but there are times that you want to spice things up, especially if you are using more than one Transhuman in your scene. For this reason, we have included the option to import Personas.
Persona is an alternative base mesh, that will replace ZERO when active, but it will continue to work with all the sliders, modifiers, and customizers.
[TO DO: ADD FULL BODY IMAGE OF SEVERAL PERSONAS]
Examples of Personas
Each Persona includes a new skin, new eyes, and a new displacement map, that will dramatically change the overall look of even two identical Transhumans.
Even more flexible! (Playing with the options)
Persona is not limited to replacing the original base character with another. It's designed to be fluid and flexible, to maximize the range of human variations that one can achieve.
In the Persona panel, you can choose which parts of the imported Persona you want to utilize, and how you want to combine them.

You can, for instance, change the Skin, Eyes, and Displacement, but continue to use the mesh of ZERO:

Using the Blend Original Face Features slider, you can use the new skin without changing the original facial features:

The Blend Original Face Features slider can also change the appearance of the imported Personas (second image is each Persona's original):


You can experiment and use different of different Personas to obtain even more Transhuman variations!
How to use Persona
To activate Persona, you must first import it into your scene. We have several Personas available in our Shop, as well as a free one for keeps.
Using your coupon, go to our shop, select the Persona you like from our catalogue and download it. Save it in your drive.
In your Blender scene, load a new Transhuman (if you haven't already), and select the folder Persona in the Outliner.
Import a new Persona into your Blender scene going to File → Append → Select the SM5 Persona file → Collection subfolder → SM5 Persona - Name*
A new base mesh will appear in your scene. You can either hide the Persona folder pressing ![]() ; hide the mesh selecting it and pressing H in your keyboard; or give the new mesh a fake user and delete it.
; hide the mesh selecting it and pressing H in your keyboard; or give the new mesh a fake user and delete it.
Activate the Persona toggle in the Plugin's menu, and from the dropdown now you will see a new base mesh, skin, and a displacement. In the Eye Color section, at the top, there will be a new eye color as well.
👉 You must change the Displ. Amount to match the recommended number written in the Persona's description, since each Persona has a different body mass, and their displacement requires different numbers.

Persona provides a lot more flexibility, since it can still be edited the same way as the default ZERO. It can also utilize the Randomizer for face discovery, the skin color options, and the body shape, gender, and age modifications.
Modifiers
There are several modifiers we can use to manipulate our Transhuman and achieve cool effects:

Subdivision Level
As you can already guess by the name and the icon, the sliders in this section control the subdivision level of your Transhuman for the viewport and for the render.
It's convenient, but it's also very important to control the subdivision from this panel rather than from Blender's Properties panel, to avoid instability and failure with the other modifiers (mainly the Surface Deform) ⚠️
Face Randomizer
The Face Randomizer is a great tool for character design and discovery!
There are two modes: Standard and Progressive.
The Standard mode allows you to randomize the face of your Transhuman by simply clicking the Randomize button. Each time you press Randomize, a new variation will appear, and will override any previous values.
The Progressive mode will randomize the existing values, being greatly suited for finetuning an already created face, or a randomized face that you think can be improved.
You can control the amount of variations with the Harmony / Chaos slider. Higher values (Chaos) will generate more extreme features, and lower values (Harmony) will create more realistic proportions.
Randomize Preset let's you choose a specific saved preset as a base to Randomize.
In this mode there is not much difference between Standard and Progressive (because the Randomizer used the selected Preset as base).

Smooth Anatomy and Facial features
As the names states, this slider is useful to smooth artifacts and strange anatomy resulting from extreme customization choices, and attempt to return the mesh to a more neutral state.
This tool is especially useful when randomizing characters with a high amount of Chaos.

👍 This option is safe to use, since it will only affect the state of customization (face and body), but never the pose or the animation data.
Bind Finished Transhuman
If the previous modifier smoothed the customizations only, this option will smooth the artifacts and deformities caused by posing and animating.
In order to achieve the best results possible during animation, you must bind the finished Transhuman in T-Pose by clicking the BIND button.
Once it's bound, the anatomy of your Transhuman will behave realistically at all times, even in the most extreme poses.

If you decide to change the Transhuman's anatomy or face, remember to press the same button that now reads UNBIND.
Once you finish editing your Transhuman, you can bind it again at any time.
Dynamic Breasts
Dynamic Breasts is a modifier designed to add an extra layer of realism to your animations with Transhuman.
Once you have the scene setup and all the animations/customizations committed, it's safe to activate the option. It can adapt to the breast size and works well with either male or female breasts.
Since Dynamic Breasts is (for now) a cloth modifier, it's important to take the following into consideration:
- Activate at the first frame to avoid explosions of the mesh
- Needs to be baked (for better results, bake before hair and clothes)
- Once baked, edits of the mesh and facial mocap animation are no longer possible, unless the bake is deleted (must bake again once all edits are final)


Dynamic Wrinkles
To add an extra layer of realism to your Transhuman renders, activate the toggle in the Dynamic Wrinkles section of the Modifiers panel.
Dynamic Wrinkles are calculated in real time and don't require baking.
The wrinkles will appear in all the parts of the body that are being pinched and compressed, such as the belly, the neck, the armpits, the inner elbows and knees, and the face.
If you wish to adjust the result, you may do so in the settings in Blender's Properties panel (Dynamic Wrinkles modifier tab)
Finalize Hair
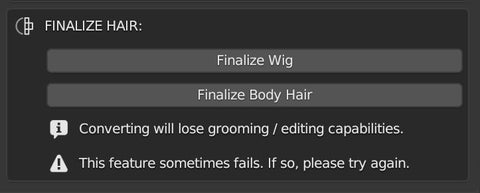
If you wish to export Transhuman to another platform and you need the hair mesh cards converted to geometry, Finalize Hair will do just that.
To make it work, you must first enable the desired hairs in the viewport, and turn them to mesh using the features in the Wig / Hair & Fur panels. Then, clicking Finalize will convert them to geometry, and grooming / editing capabilities will be lost.
Please remember that this modifier randomly fails from time to time. Trying again and again seems to work in most cases.
Teeth
Transhuman4Blender comes with an anatomically correct mouth cavity, with proper gums, tongue, throat, and teeth.
The mouth cavity is integrated in the body, and it responds to the customization edits, but there are certain edits that are related to the teeth in particular, and you can find all those in this the Teeth Panel.

The first setting is the Denture Height. After you have completed your Transhuman's design, you can check the denture's position, and adjust it if it's too high or too low.
The best way to check is to activate the Face Rig option in the Armature Panel, and select the 'Smile Teeth' pose from the animation library. Now, with the denture visible, you can preview the render and adjust the height.
Teeth Age adds yellowish-brown color to the teeth and Color Saturation decreases the saturation. Playing with the settings it's easy to achieve natural enamel colors.

The Gap option add a gap between the front top or bottom teeth.

Crookedness rotates and turns some of the teeth to break the evenness and add an extra level of realism.

In the Shape panel you can change the size and the length of the teeth.

Fangs increases the length of the fangs in the top or the bottom.

Missing Teeth removes the selected tooth (identified by the Dental Chart Number). To remember which is which, picture the toggles like they are the teeth facing forward: the numbers 8 and 9 are the center top teeth, and the numbers 25 and 24 the center bottom.

Make-up
The Make-up panel is very extensive, and it has tons of options to create the most beautiful make-up effects!
To apply make-up to a certain portion of the face, simply enable the toggle and edit the colors, the Amount (fade, opacity), and the Gloss/Matte, and Metallic effects.

Base
The Base option adds color to the face to even out the surface. It is great to achieve a smooth, perfect skin effect.
You can choose any color you like in the color picker. To select the best match for your Transhuman's skin, switch the render preview to Diffuse Color.

Expand Base will increase the area of paint to the neck and part of the chest. On the back of the neck it has a three line shape (Sanbonashi (三本足)) in the fashion of the Japanese Maiko.
Base Thickness regulates the amount of color applied.
Contouring adds dark and light colors to the base, to accentuate the facial shapes.

Blush
The Blush is divided in three portions: The front center of the cheek (1), the cheekbone (2), and the hollow space under the cheekbones (3).

Thickness makes the area larger and more dense. Metallic Effect adds metallic reflections. Glossy/Matte adds a wet/dry look to the paint.
Lips, Lip Liner
In the Lip section you can choose the lipstick color, the amount, how metallic it is, how glossy/matte...
There is also an option of adding Lip Gloss, which will simulate a thick layer of transparent gloss over the lips, smoothing the lip details just like real gloss would.
The Lip Liner has its own color picker too, and besides having all the same options as Lips, it has one extra option to smudge the border, great for blending and making lip color gradients!

Eyeshadow Lid, Lower Lashline, Inner Corner, Outer Corner, Highlight
The Eyeshadow is split in several subpanels that correspond to the parts make-up artists follow on their workflow.
- The first part is the Lid. You can add just one color, or divide the lid in three sections (inner corner, center, and outer corner) for gradations.
- The Lower Lashline works in the same way, being divided in one main section, and two extra coloring layers towards the tearduct and towards the eye corner. There is one extra color slot for smudging the color down towards the cheek.
- Inner Corner lets you add gradients of color in the areas closer to the nose, the tearduct, and close to the eyebrow.
- Outer Corner adds extra gradients on the out side of the eye and towards the eyebrow, perfect for smoky eye effects!
- Highlight colors the space between the Lid and the Eyebrows. This area is good for adding soft colors and highlights. There are also three layers of paint: The global one (that covers all the area), Crease (for the area nearest the nose), and Contour (for the outer part of the eye).

And just like in every other panel, there are options for glossy/matte, smudging, fading, and metallic effects.
Eyelner
There are 12 Eyeliner strokes available: T1-6 for the Top and B1-6 for the Bottom.
You can choose the color, the Amount, the Metallic, and the Gloss/Matte effect.

Facial Paint
The facial paint is really just three slots of special make-up for three parts of the face: The forehead, the eyes, and the jaw.
It's useful to make war paint, sci-fi, and other spiritual, ritual face paint.

Eyebrows
The Eyebrow panel hosts a dropdown menu with a list of eyebrows that are designed to match the shape of the existing eyebrows in the Hair & Fur panel below.
If you activate the eyebrows make-up, you must make sure it matches the one in your Transhuman's Hair & Fur section (the plugin doesn't do it automatically, for now)
Beside the shape, you can manipulate the amount, the smudge, and change the color!

Nail Polish
In the Nail Polish section you can add nail polish to the hands and the feet of your Transhuman.
Specify the Amount (transparency of the paint), select the Color, make it Metallic. With the Roughness slider you can achieve a matte polish effect.
Coat adds a shinny reflective effect to the surface. The slider maximum is 1, but you can input higher numbers to make the nails even more reflective!
Glitter adds a glittery effect on top of the color.
Finally, you can increase the Nail Length. This slider is connected to the Nail slider in the Body Panel, so changing one will update the other.

Wig
The Wig panel has options that control the color and style of your Transhuman's hair. These options, along with other customizations, can all be saved in the presets, allowing you to load your saved Transhuman presets with their own custom Wig.
Please note that, for now, the plugin doesn't save the grooming edits you make, only the hair style (color, curls, waves, frizz, etc...)
Color Options
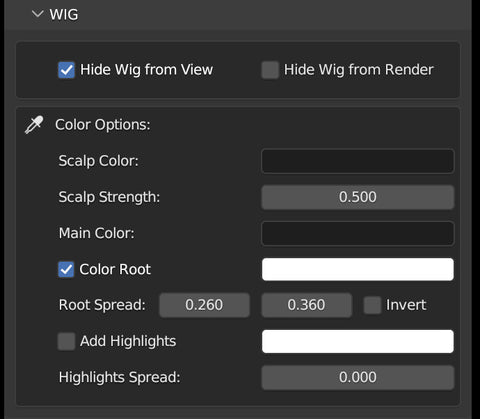
The first two toggles allow you to hide the Wig in the Viewport and/or in the Render.
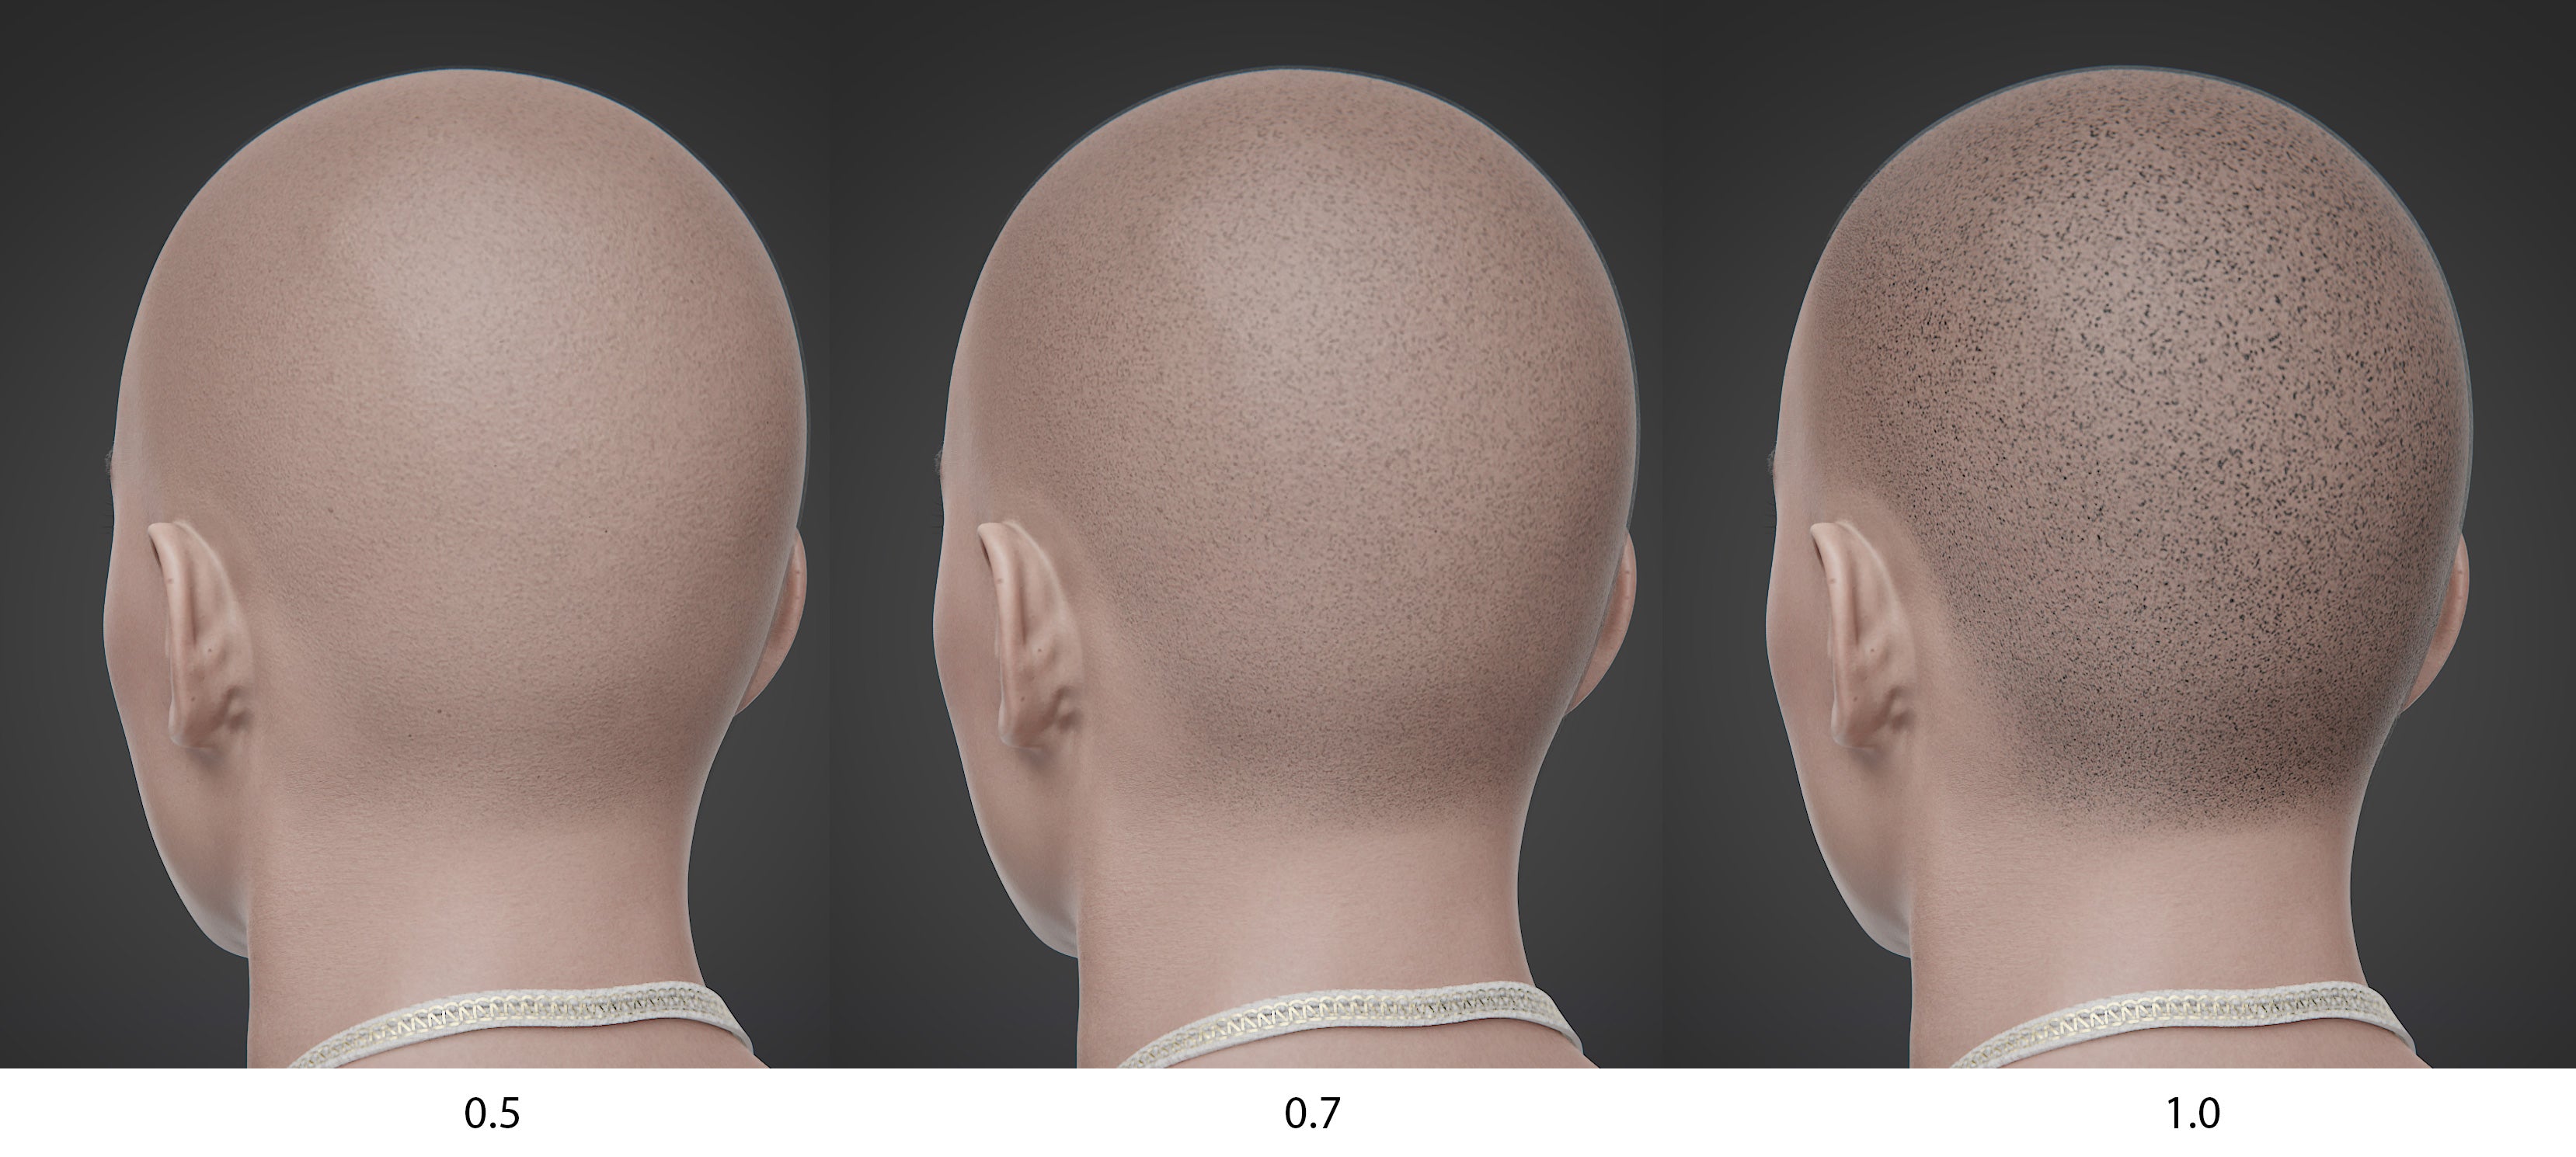
Next, we have the color options. You can specify the Color of the Scalp and the Strength (opacity, thickness of the shaved hair). This option is great for hiding bald spots that might show through the hair by darkening the scalp to match the desired hair color. The maximum value of the slider is 1, but you can add higher numbers if you need a greater coverage.
Main Color is the dominant color of your Transhuman's hair.

The Root Color toggle activates the color of the roots, which you can then edit. With Root Spread you can spread the color of the root and make it sharp or smooth using the sliders. Invert will switch the coloring from the Root to the Tips.

Add Highlights enables a secondary color to the hair. It's very useful to add grey hairs or color variation. You can control the amount of highlights with the Highlight Spread slider.

If you wish to make a new hair, please use the included "SM5 Transhuman Hair" as the base, the "SM5 Hair Particle Material", and the "SM5 Hair" geometry nodes for this panel to work 👌
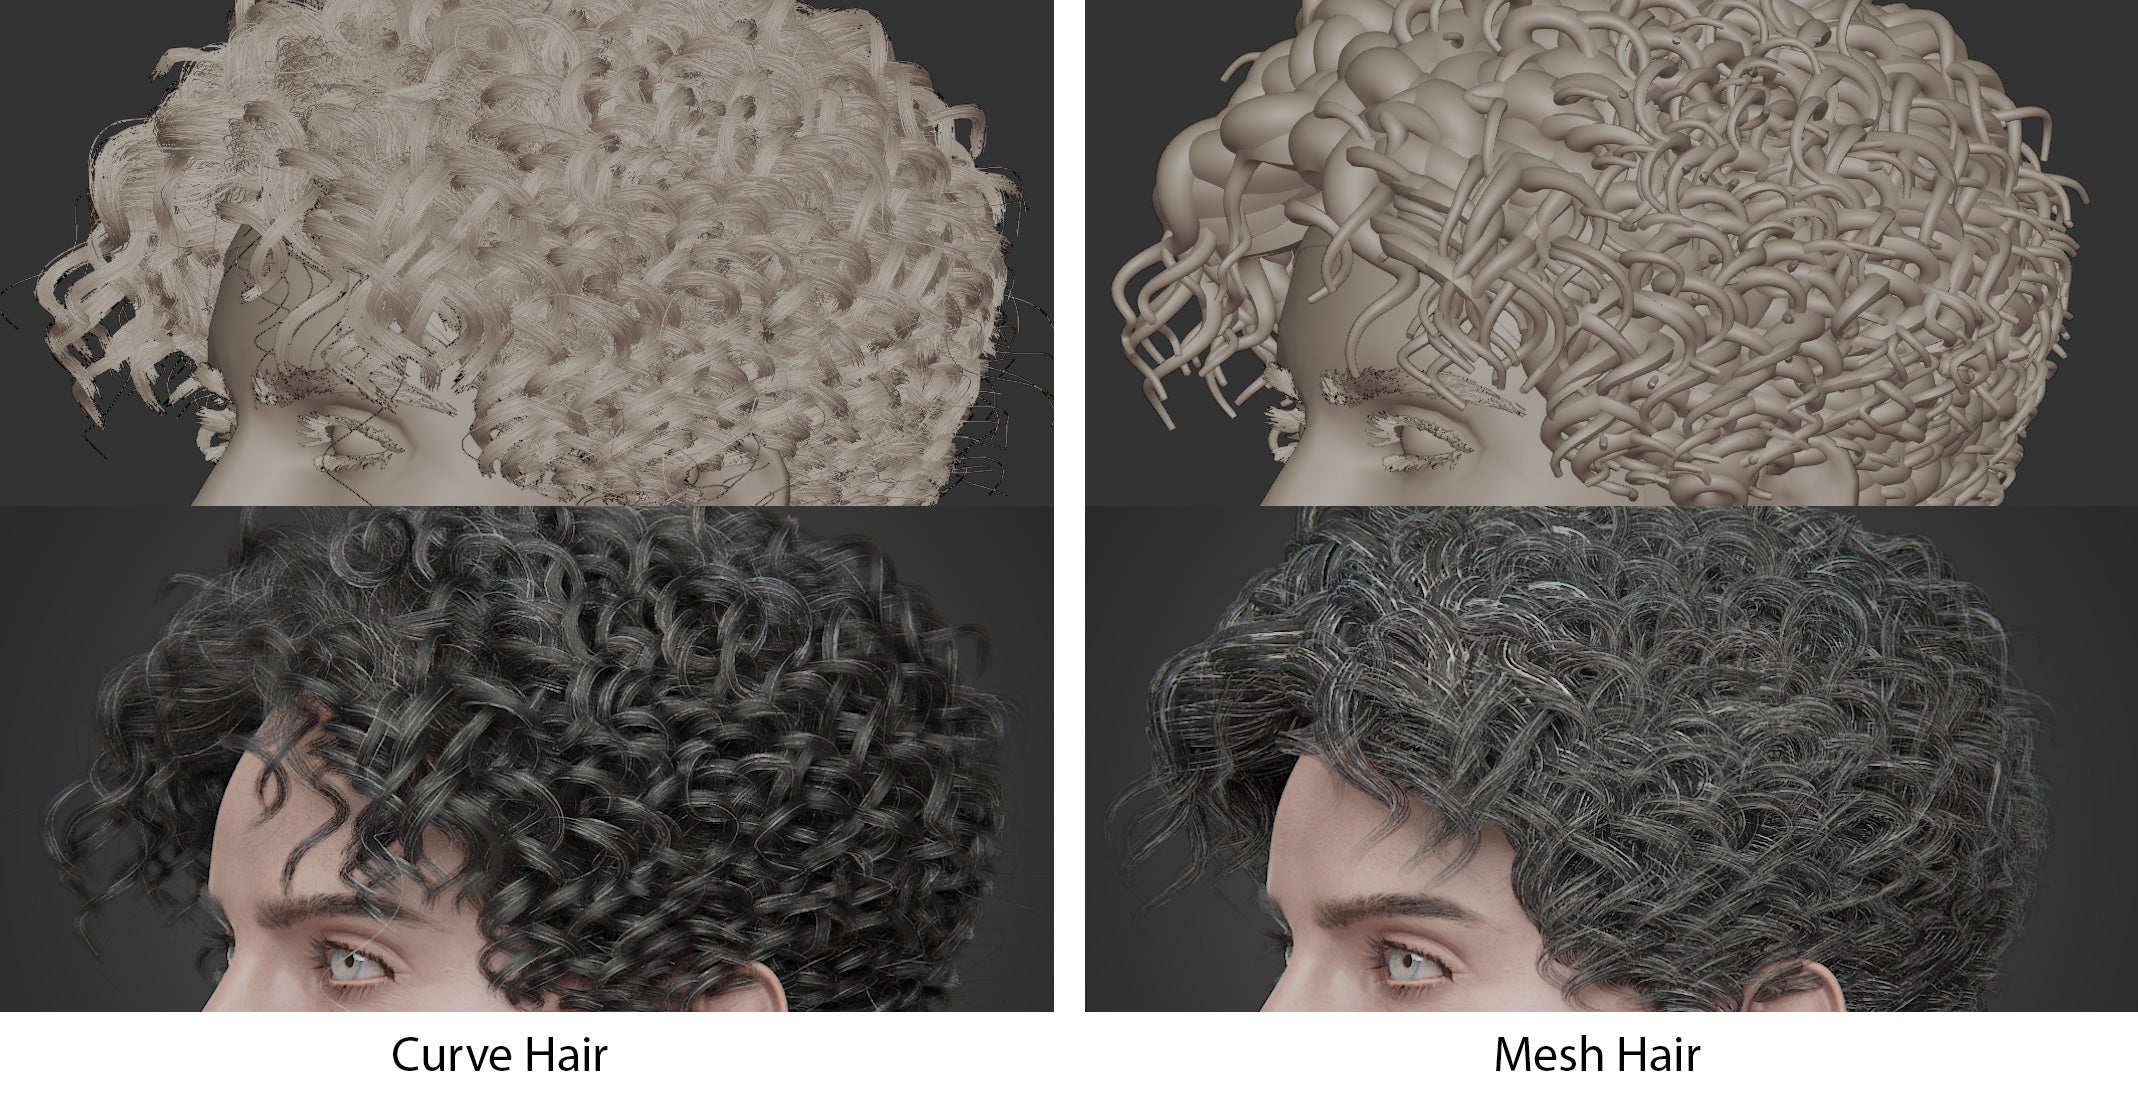
Hair Appearance (Basic)
The Hair Appearance (Basic) section holds the settings that are common for both Mesh and Curves hair.
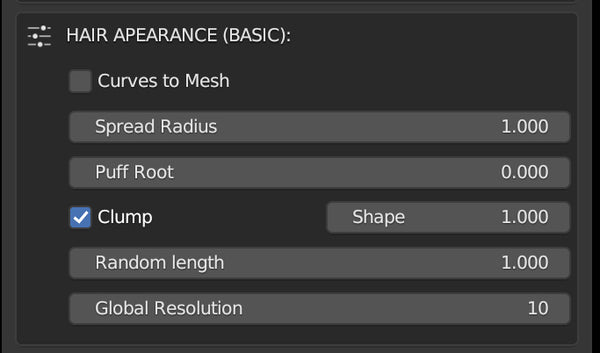
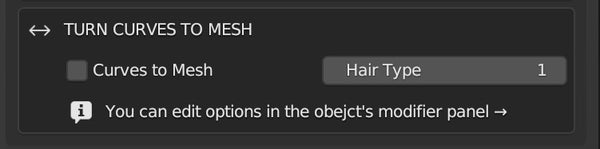
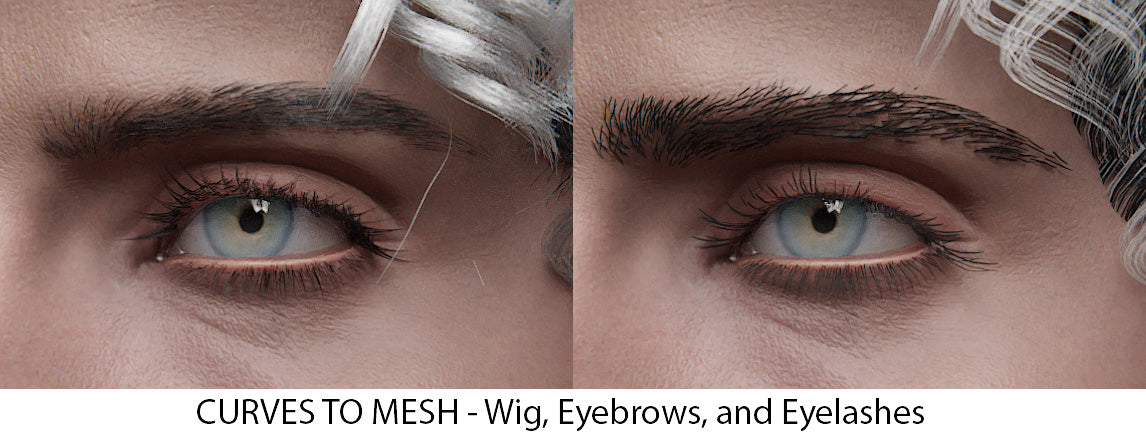
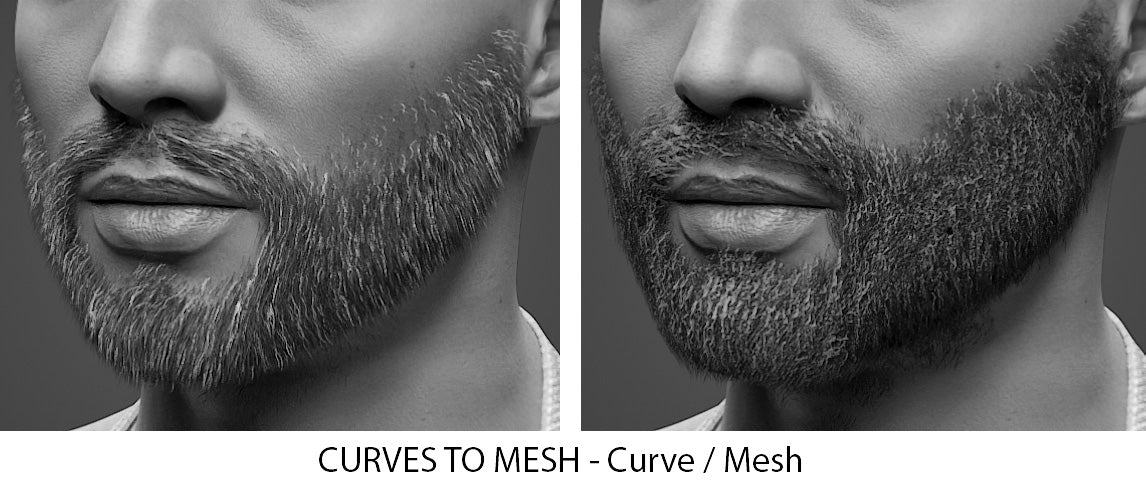
The first toggle allows you to automatically turn your hair into Mesh, maintaining the same shape and color customizations, and an overall identical appearance. This option is great from those who whish to export custom Transhumans to other platforms.
✨ Even with Curves to Mesh toggled, you can continue to edit and groom the hair, as if it was regular hair curves!
The Spread Radius is the distance in which the Children hairs will grow around the Parent (for Curves Hair), and in the case of the mesh tubes, the diameter.
Puff Root elevates the hair near the roots upwards. Useful for when the hair is so close to the scalp that creates bald spots and artifacts.
Clump makes all the Children hairs gather at the tip. Shape affects the strength of the effect, being 0 'no clump' and 1 'full clump'.
Random Length makes the length of the hair strands uneven, perfect to add realism and break the shape.
Global Resolution sets the resolution of the Parent hair curves. This settings overrides the Curl Resolution, so you might want to make it higher at first, and lower the value once the hairstyle is decided.
Curls & Waves
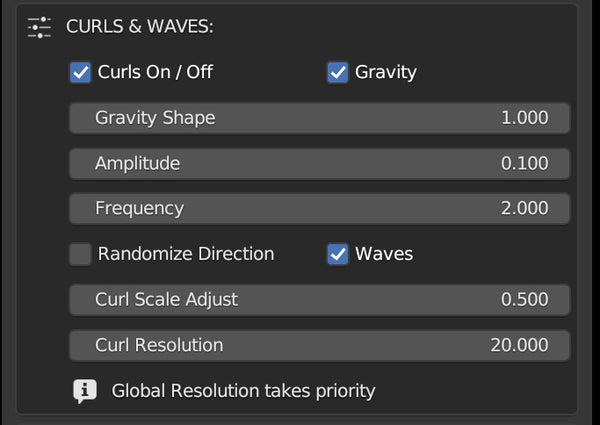
The first toggle activates the Curls & Waves option.
Gravity softens the curling of the hair near the roots. It's a way of adding transition from straight to curly.
Amplitude makes the curls' diameter bigger or smaller.
Frequency makes the curls closer together by adding new curl loops.
Randomize Direction breaks the evenness and makes the curls face random directions.
Waves makes the curls flat.
Curls Scale Adjust makes the overall curl effect bigger or smaller. A number of 0 returns the hair to straight. You can use number above 1 to make the curls larger easily.
Curl Resolution makes the Parent curves increase the number of points. Use it when the curls look jagged or undefined, to soften them. Global Resolution takes priority. If the curls look bad even with high resolution, increase the Global Resolution in the section above.
Loose Hairs
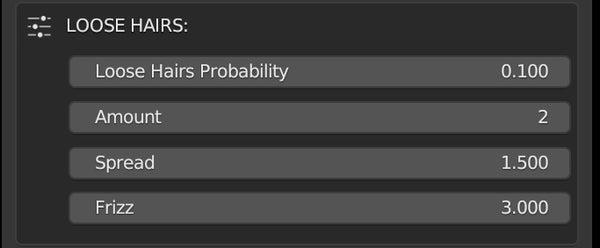
Loose Hair Probability increases the number of loose hairs that spike out of the mass. Amount multiplies the loose hairs for the desired number. Spread makes the loose hairs stick out more or less. Frizz makes the loose hairs' surface noisy.
Advanced Options (Curves)
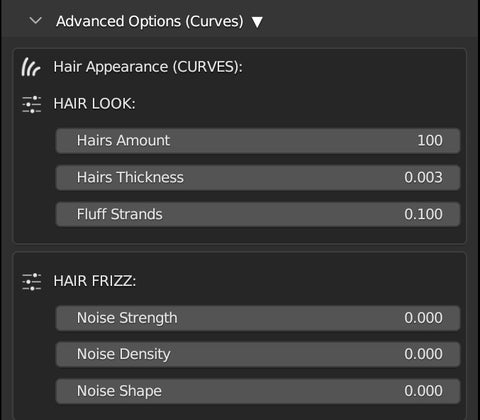
The options in this panel deal with the final look of the curves hair. In this panel you can specify the Hair Amount that will be displayed and rendered, the Thickness of the rendered hairs (not visible in the viewport, must render preview to check), and Fluff the strands.
The Hair Frizz option helps you add noise to the hair structure to make it uneven and frizzy.
Advanced Options (Mesh)
This panel holds all the options to finetune and optimize your Transhuman's mesh hair.
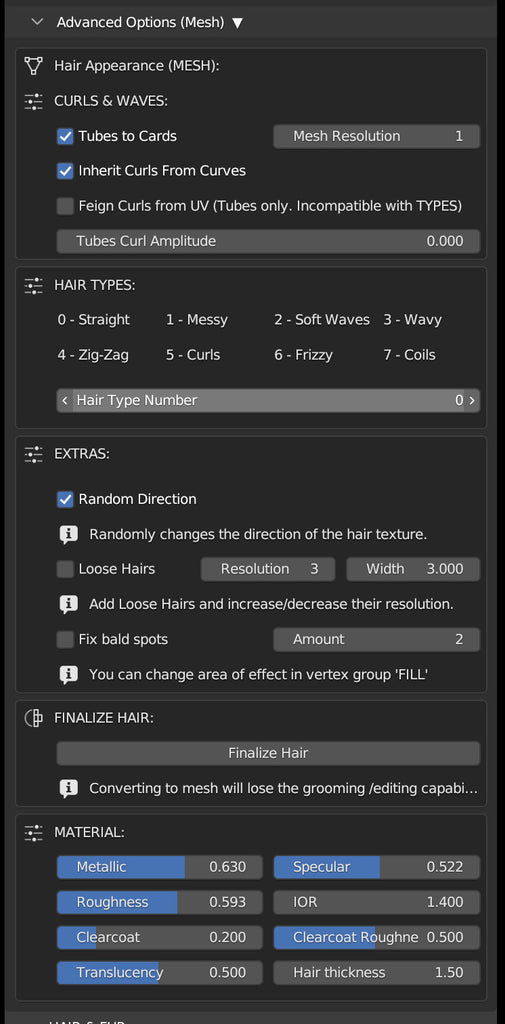
👉 Please note: None of this options will work unless the Curves to Mesh toggle is active at the top of the wig panel.
If you activate the Statistics option in the Overlays panel (Blender) you can see the number of polys that your visible scene elements have.
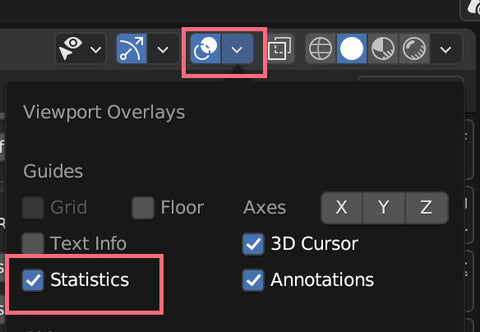
Without hair and clothes, a low-res Transhuman has around 9k faces / vertices (18k triangles). The number quickly increases once we add the eyes, the nails, the teeth, etc...
The mesh hair can also add a lot of polys to the finished Transhuman, so it's good practice to check this number and try to optimize the hair. A number of polys below 100k is good, but the lower you can go, the better performance you'll get.
The first two options will do just that. Tubes to Cards replaces the mesh tubes for flat cards, reducing dramatically the number of polys by half. It will still look great, almost identical! The counter side is that there might appear bald spots here and there (those can be fixed later).

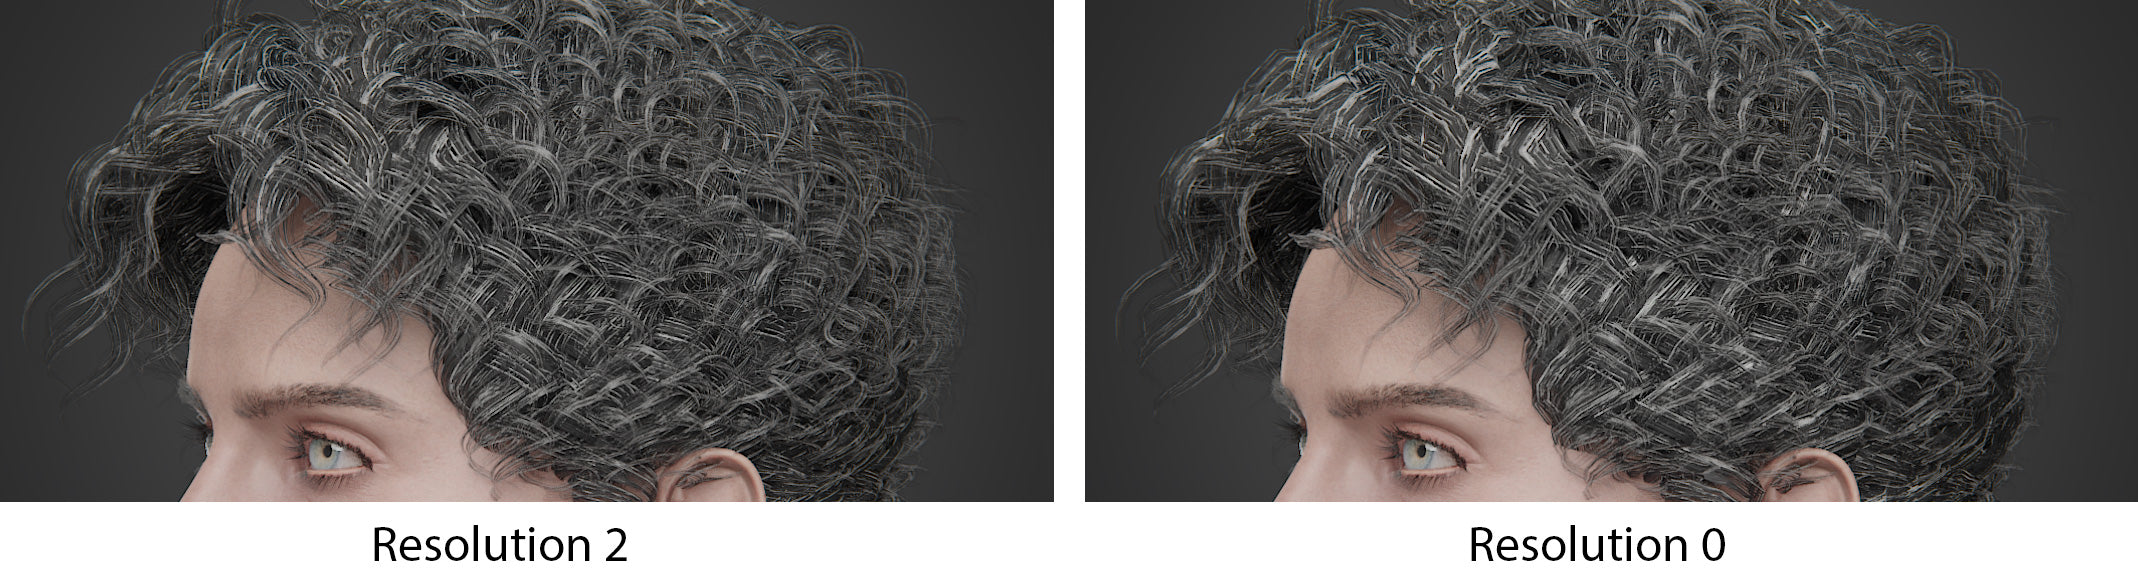
Mesh Resolution adds a subsurface subdivision to the hair mesh, making it smooth but also increasing the number of polys. A level of 0 to 1 is best for exports.
Inherit Curls from Curves makes the mesh hair follow the same curvature as the Parent curve hair guides. This offers an amazing result, but it will increase the poly count.
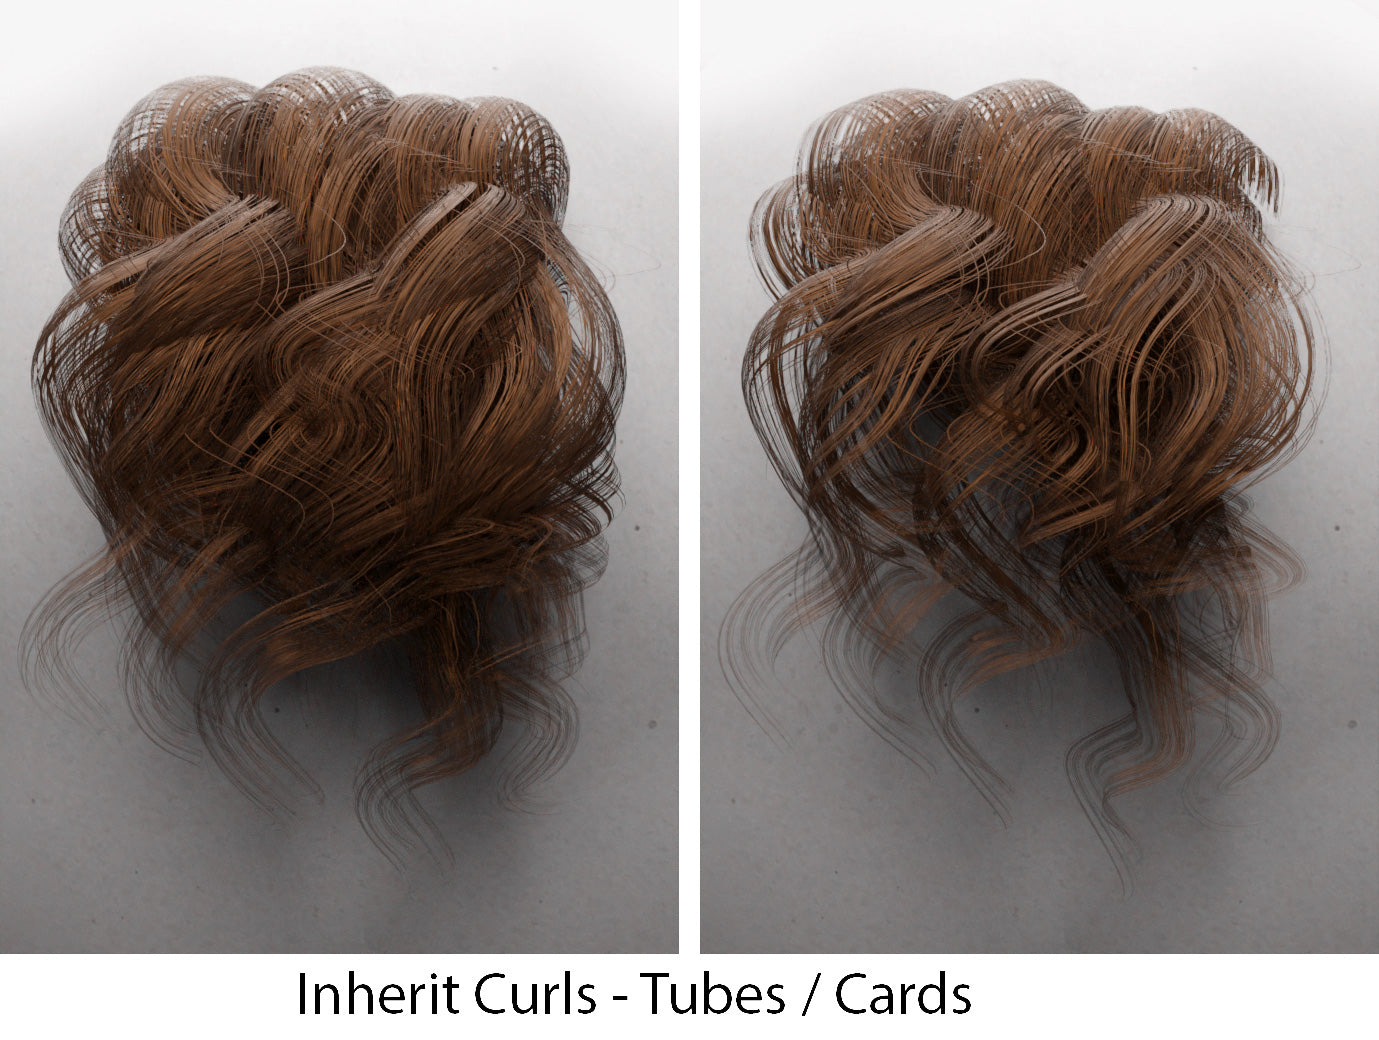
Feign Curls from UV is a much cheaper option (poly-count wise), since it simulates the curls by twisting the UV textures instead of the actual geometry. This option is only compatible with tubes (not cards), and it cannot utilize the Hair Types, as explained below.
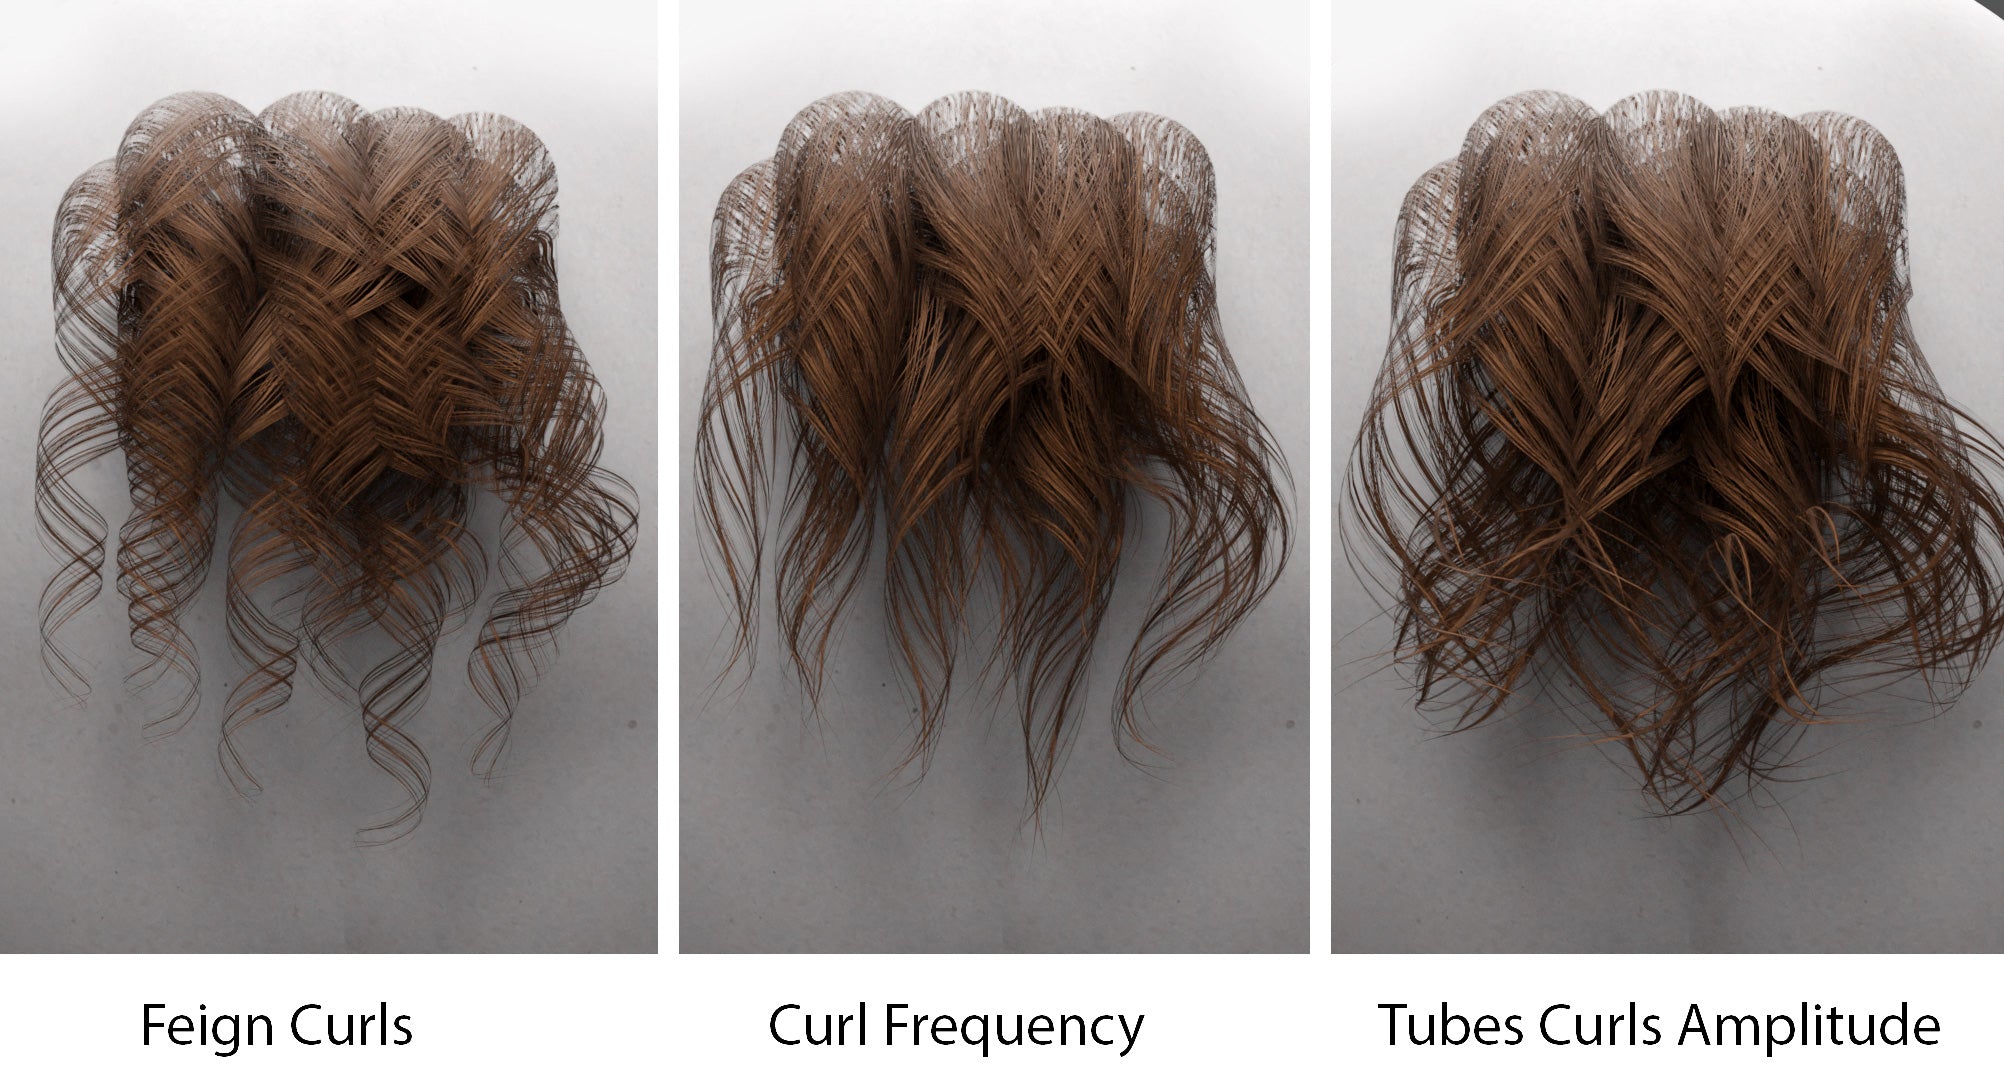
Tubes Curl Amplitude makes the tips of the mesh tubes larger, just like the Amplitude option does in the global CURLS & WAVES section above. The Curl Frequency is linked to the setting in the global panel, as it's intended to mimic the same aesthetic as the original curves hair.
Hair Types
There are eight types of hair available for the Mesh Hair (cards or tubes), and they can be selected in the Hair Type Number. The hair has a slightly different appearance in card and in tubes, as seen in the following sample.

This option gives you even more flexibility when you are using mesh hair, since the same hair style can become entirely different by just changing the type.
Extras
Random Direction randomly changes the direction of the texture to break the evenness.
 Loose Hairs adds an extra layer of mesh cards that will simulate loose hairs to incorporate extra realism (and extra polys to the final count). Resolution makes the loose hair cards smoother, and Width makes them wider.
Fix Bald Spots inserts new hair guides in the selected area (the default is the head's center-top), and Amount specifies the proportion of the addition. To edit the area of influence, edit the vertex group 'Fill' from SM5 Scalp Transhuman.
Finalize Hair
If you wish to export the hair, you must first convert it to mesh. Finalize Hair removes the original curves-based hair and turns the Wig to geometry. Remember that by doing so, all the editing and grooming capabilities will be lost.
Material
The sliders in this section allows you to easily modify the mesh hair material from the panel without having to visit the Shader Editor 👍
Hair & Fur
The Hair & Fur section controls all the hair in the body that is not Wig.

The first toggle hides the hairs from view to speed up the computer.
Eyebrows
In the Eyebrows section you can choose the color of the hair. This color picker is linked to the one in the Makeup section, and changing one will change the other.

Next, in the EYEBROWS (CURVES) section, you can choose an Eyebrow shape for your Transhuman. There are currently 5 designs to choose from:

You can also customize these by changing the Hair Amount, the Hair Spread (separation of the children), the Thickness of each individual hair curve, and add Noise to make the eyebrows messier. All these settings will be recorded when you save a Transhuman preset.
There are also five low-poly mesh eyebrows to choose from, with very similar shapes to the previous. These are great for exporting, or for rendering in Eevee.

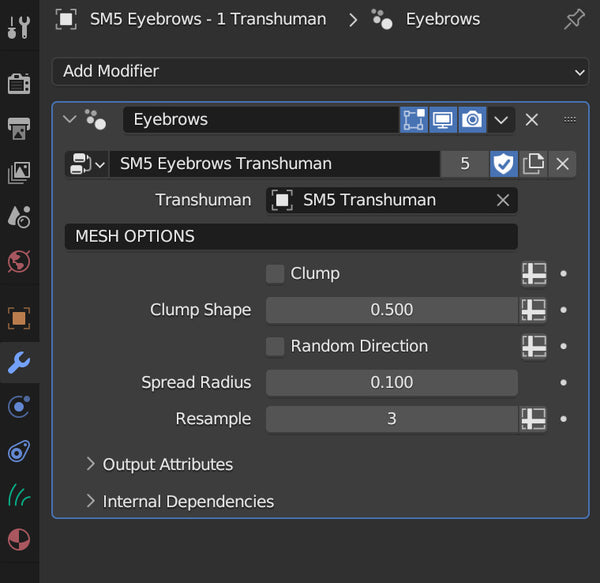
The last section, TURN CURVE TO MESH, converts the chosen curve eyebrows into mesh cards. Each hair curve (parents and children alike) will be converted to mesh. This option is great for making a new eyebrow shape!
Once converted to mesh, there are Eight types of hair type to choose from, ranging from 0 to 7.
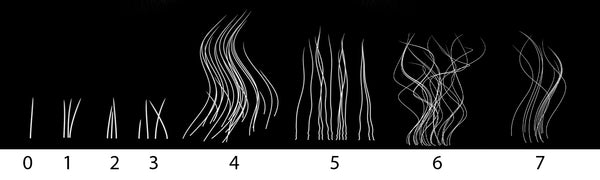
0 to 4 work best for short, small hairs like eyebrows, eyelashes, and thin body hairs such as those found in arms, hands, feet, and shins. 4 to 7 are best suited for large, wide cards of longer hairs (such as large areas of body, and beards).
You can find additional options for the individual look of the mesh cards in the modifiers panel (must have the desired hair curves selected)
💡 TIP: To make new low-poly mesh card hairs with this option, please lower the Hair Amount in the Curve panel to 0 and, using hair curve sculpting tools, design the new grooming style.
Eyelashes

In the Eyelashes panel you can pick the Color, and modify the Hair Thickness, the Length, the Hair Amount, the Spread, and the Clump.
All choices are saved when you make a new Transhuman present.
Eyelashes also have a TURN CURVE TO MESH option (please check the Eyebrow section for more information on how to use).
Beard & Stubble
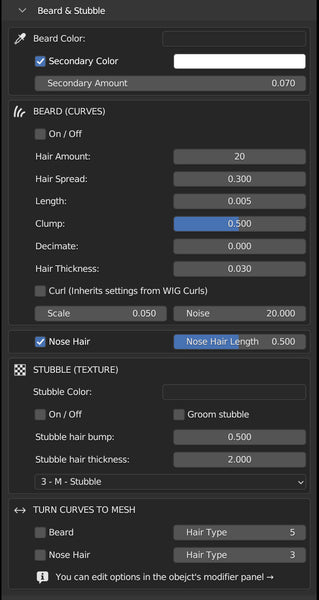
Toggling the On/Off button in the Beard section, a scratchy stubble appears on your Transhuman's face. You can edit the appearance by changing the colors (main and secondary), increasing the Hair Amount, the Spread, the Length, and the Clump.
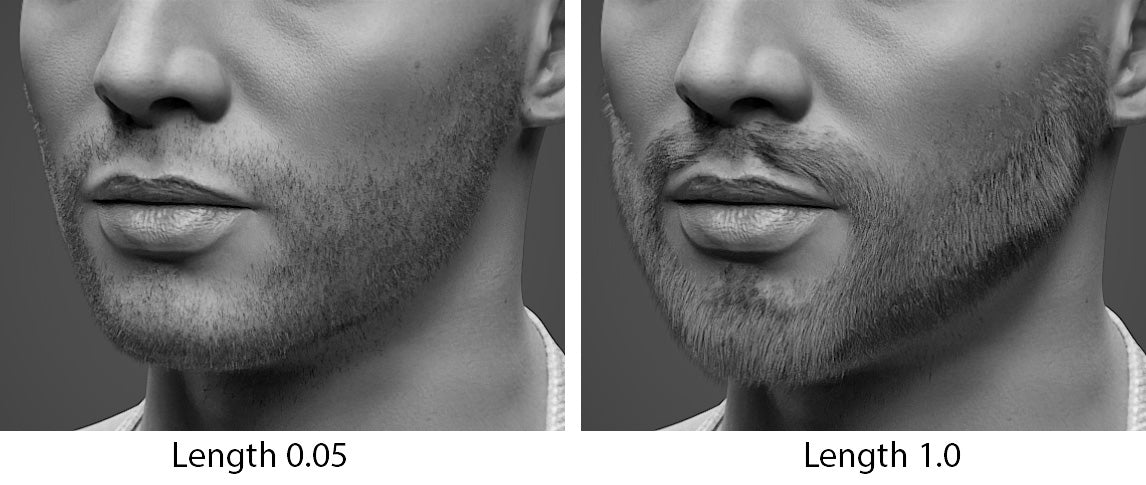
By default, the beard's length is set at 0.005 to create a natural stubble effect. To obtain a beard, please set this number to 1. Feel free to groom and edit the beard using the sculpt hair tools.
You can decimate the hairs to add bald spots or unevenness, and change the thickness of the rendered curve hairs.
The Curl toggle inherits the curl settings from the Wig section. We recommend to scale down considerably (a value of 0.05 offers great results), to achieve a wavy effect in harmony with the Wig hair. Noise can also add a bit of realism by breaking the evenness of the hairs.
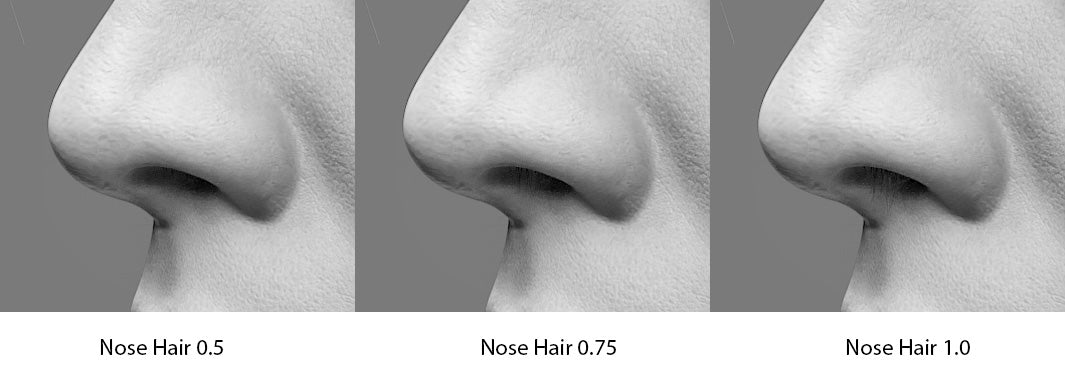
There is an option for adding Nose Hair and controlling its Length. Nose hair adds to your Transhuman a small but very necessary level of realism!
In the STUBBLE (TEXTURE) section, there are options to activate a simulated stubble (texture based). This option is great for faster renders, and it looks very realistic.
The Color of the stubble texture can be changed as well, and it's independent of the color of the Beard.
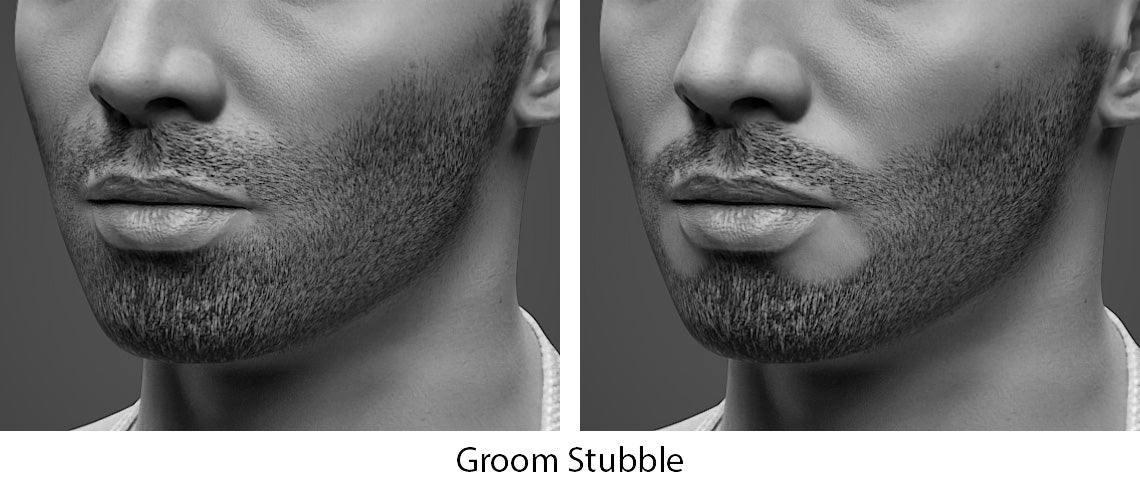
The Groom stubble toggle cleans up the stubble and makes it neat. Hair Bump and Thickness modify the feel of the stubble texture. The dropdown holds a list of 5 types of stubbles, that range from XS to XL.

The Beard & Stubble section also has a TURN CURVE TO MESH option (please check the Eyebrow section for more information on how to use).
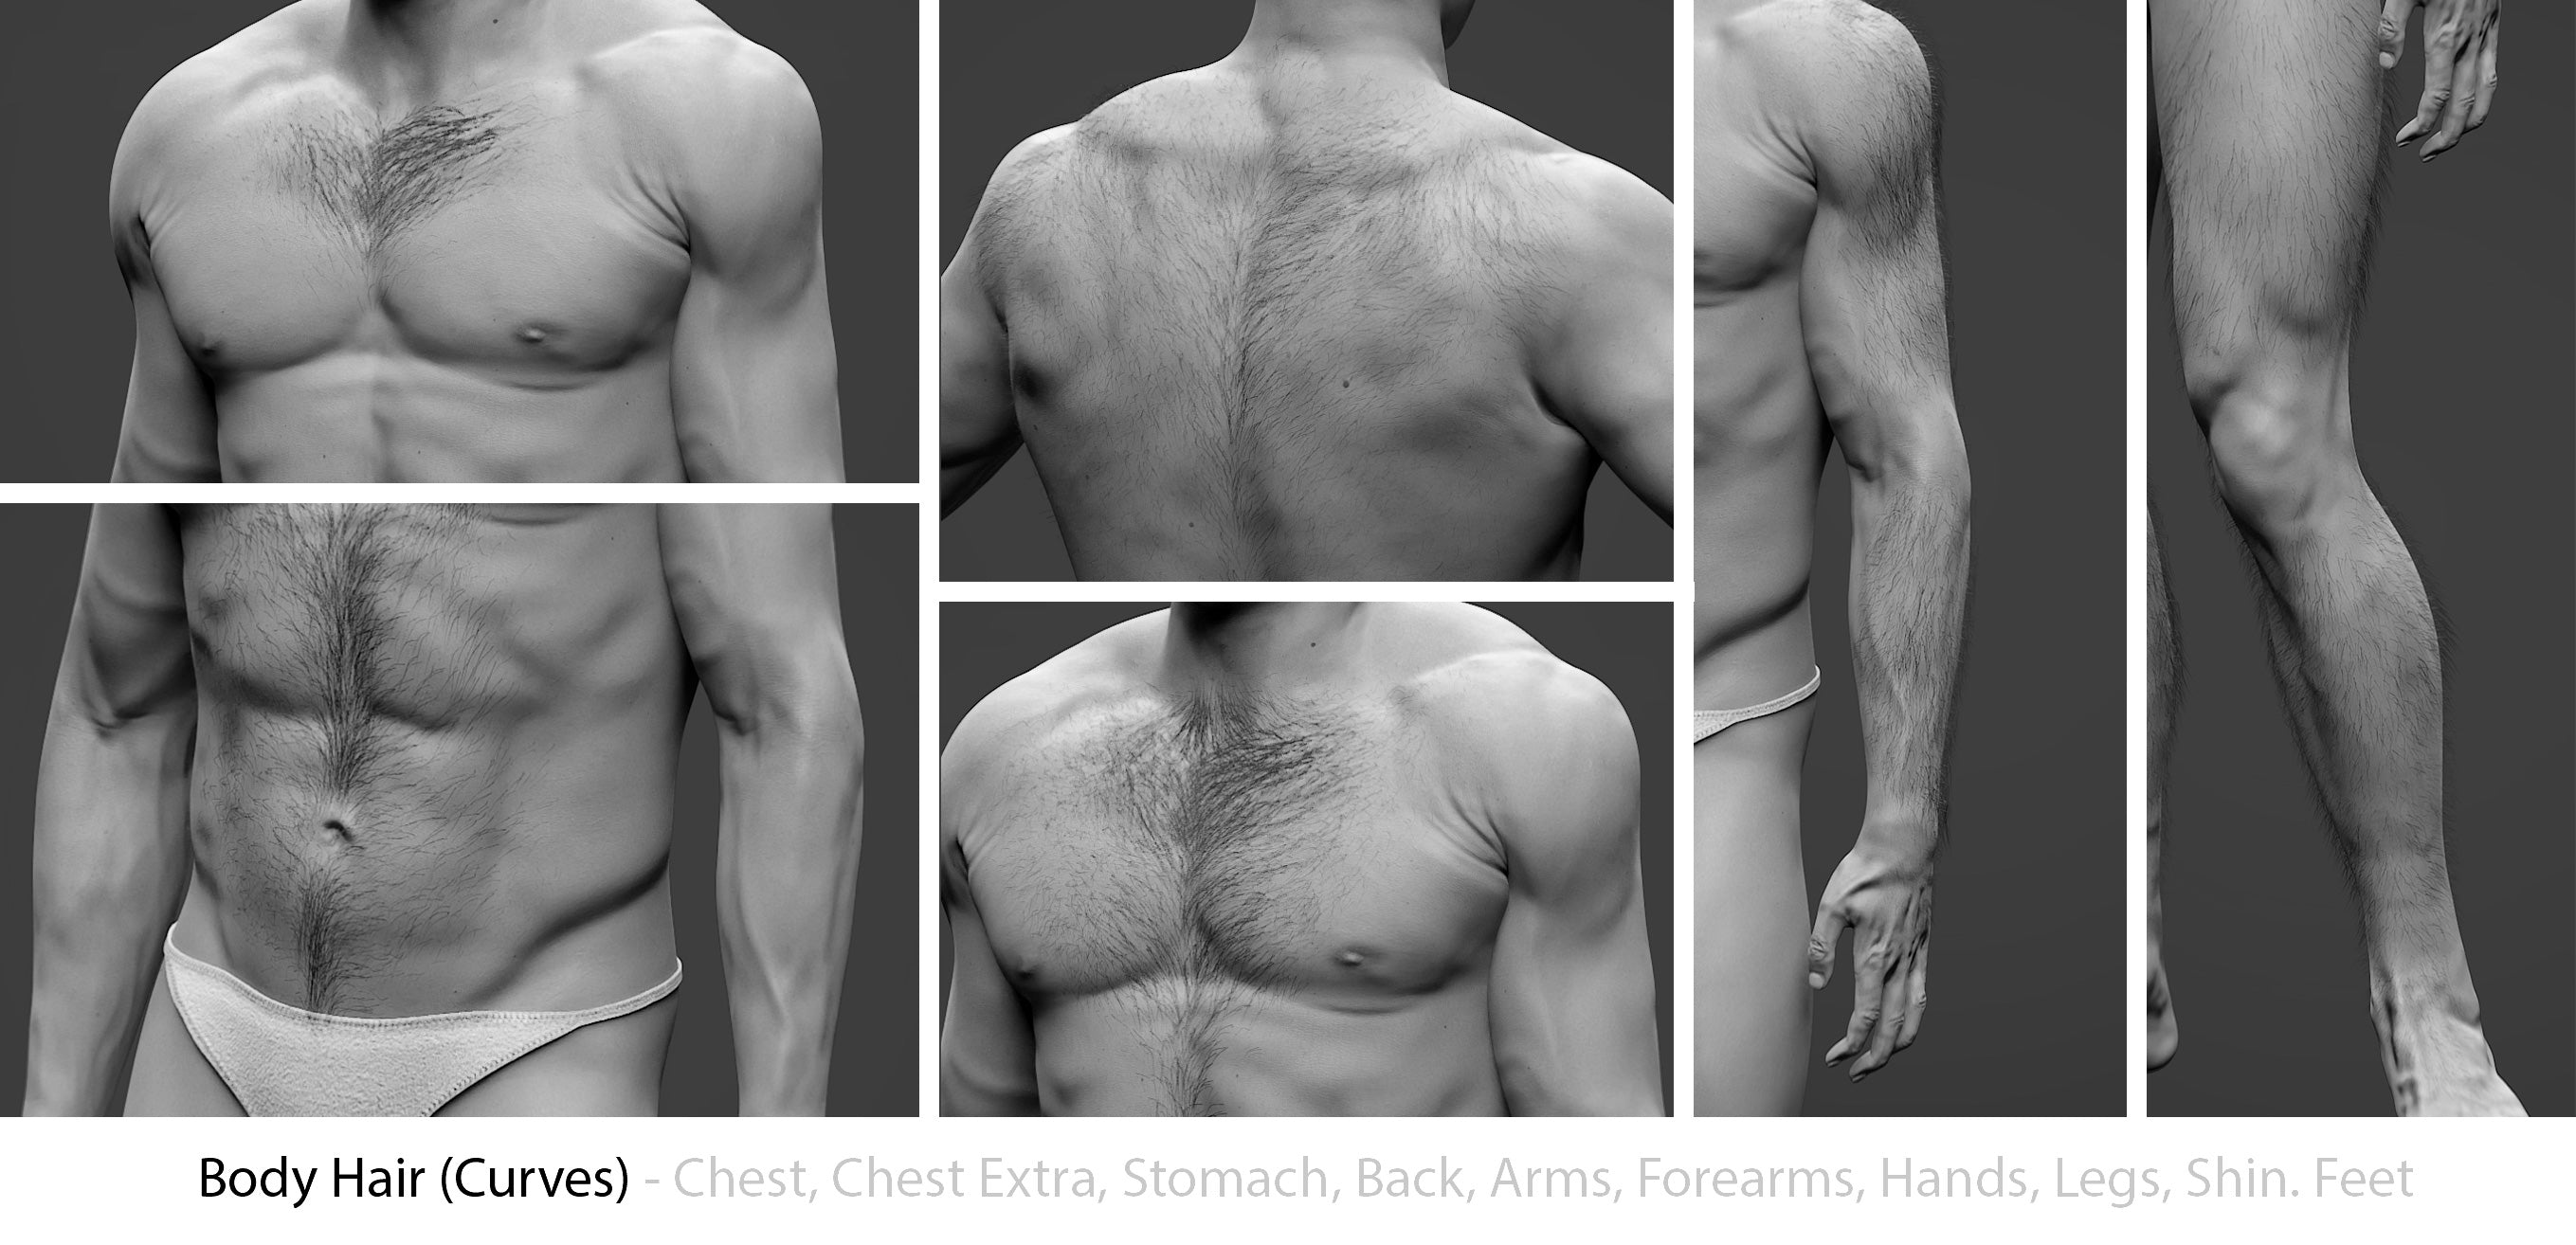
Body Hair

This section contains a large list of body parts to add hair to. Like all the other hairs, body hair has a main color and a secondary color, that can be activated or disabled. With Amount the secondary color slowly takes over, till it overrides the primary color.
Enabling the toggle, a each body hair appears (unless the Hide Body Hair toggle is active).
💡 Peach Fuzz may not be visible because it's hidden in the viewport to avoid visual congestion. However, as long as it's active in the toggle list, it will render. The effect is very subtle and may not be noticeable, but it will add an extra layer of realism to your render.
There are many options to customize the body hair's look and feel, such as Hair Amount, Hair Spread, Trim, Clump, Decimate, and Hair Thickness (affects only the rendered hair).
Noise Scale, Strength, and Scale they all add curliness to the body hair and make it look rough. Random length creates length variations between the hairs, to add realism.
By selecting individual hair groups a set of specific option appear in the modifiers panel. These are great for finetuning the hair groups (such as reducing or increasing the thickness of a particular group, etc)
Just like with all other hair curves, the Body Hair panel also has a TURN CURVE TO MESH option (please check the Eyebrow section for more information on how to use).
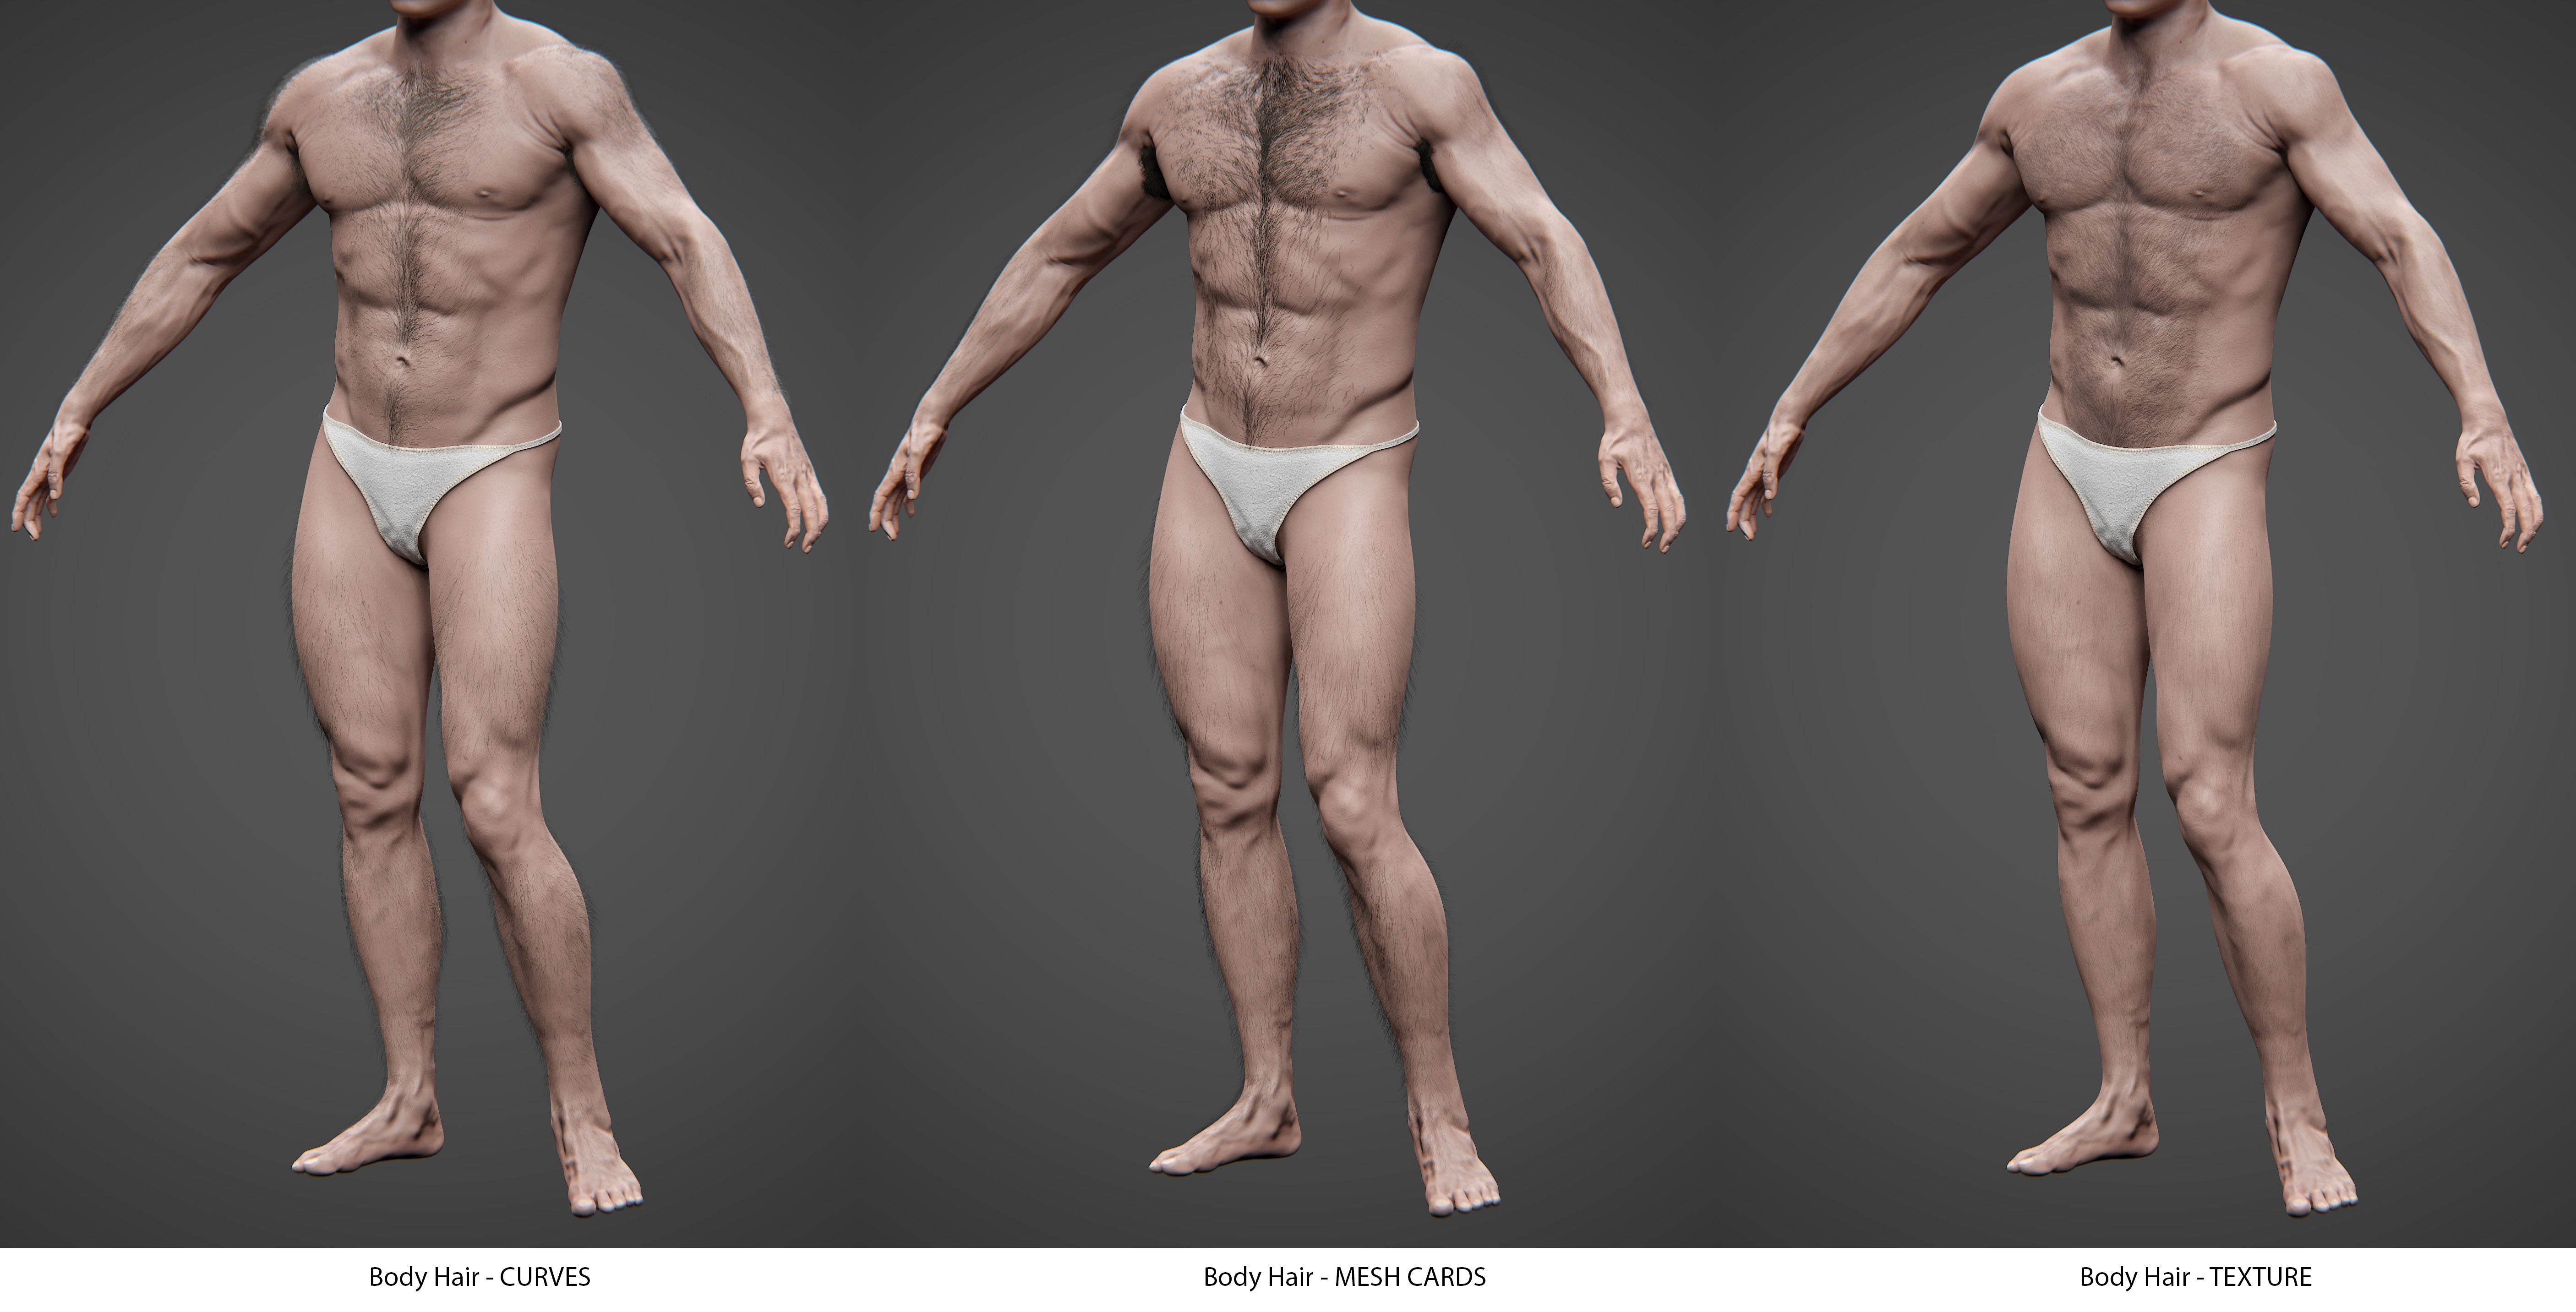
Body hair (Texture)
A great way of adding character and detail without increasing the computational burden is to add texture based body hair. This feature adds a layer of body hairs to the skin of your Transhuman, simulating the effect without adding any extra geometry.
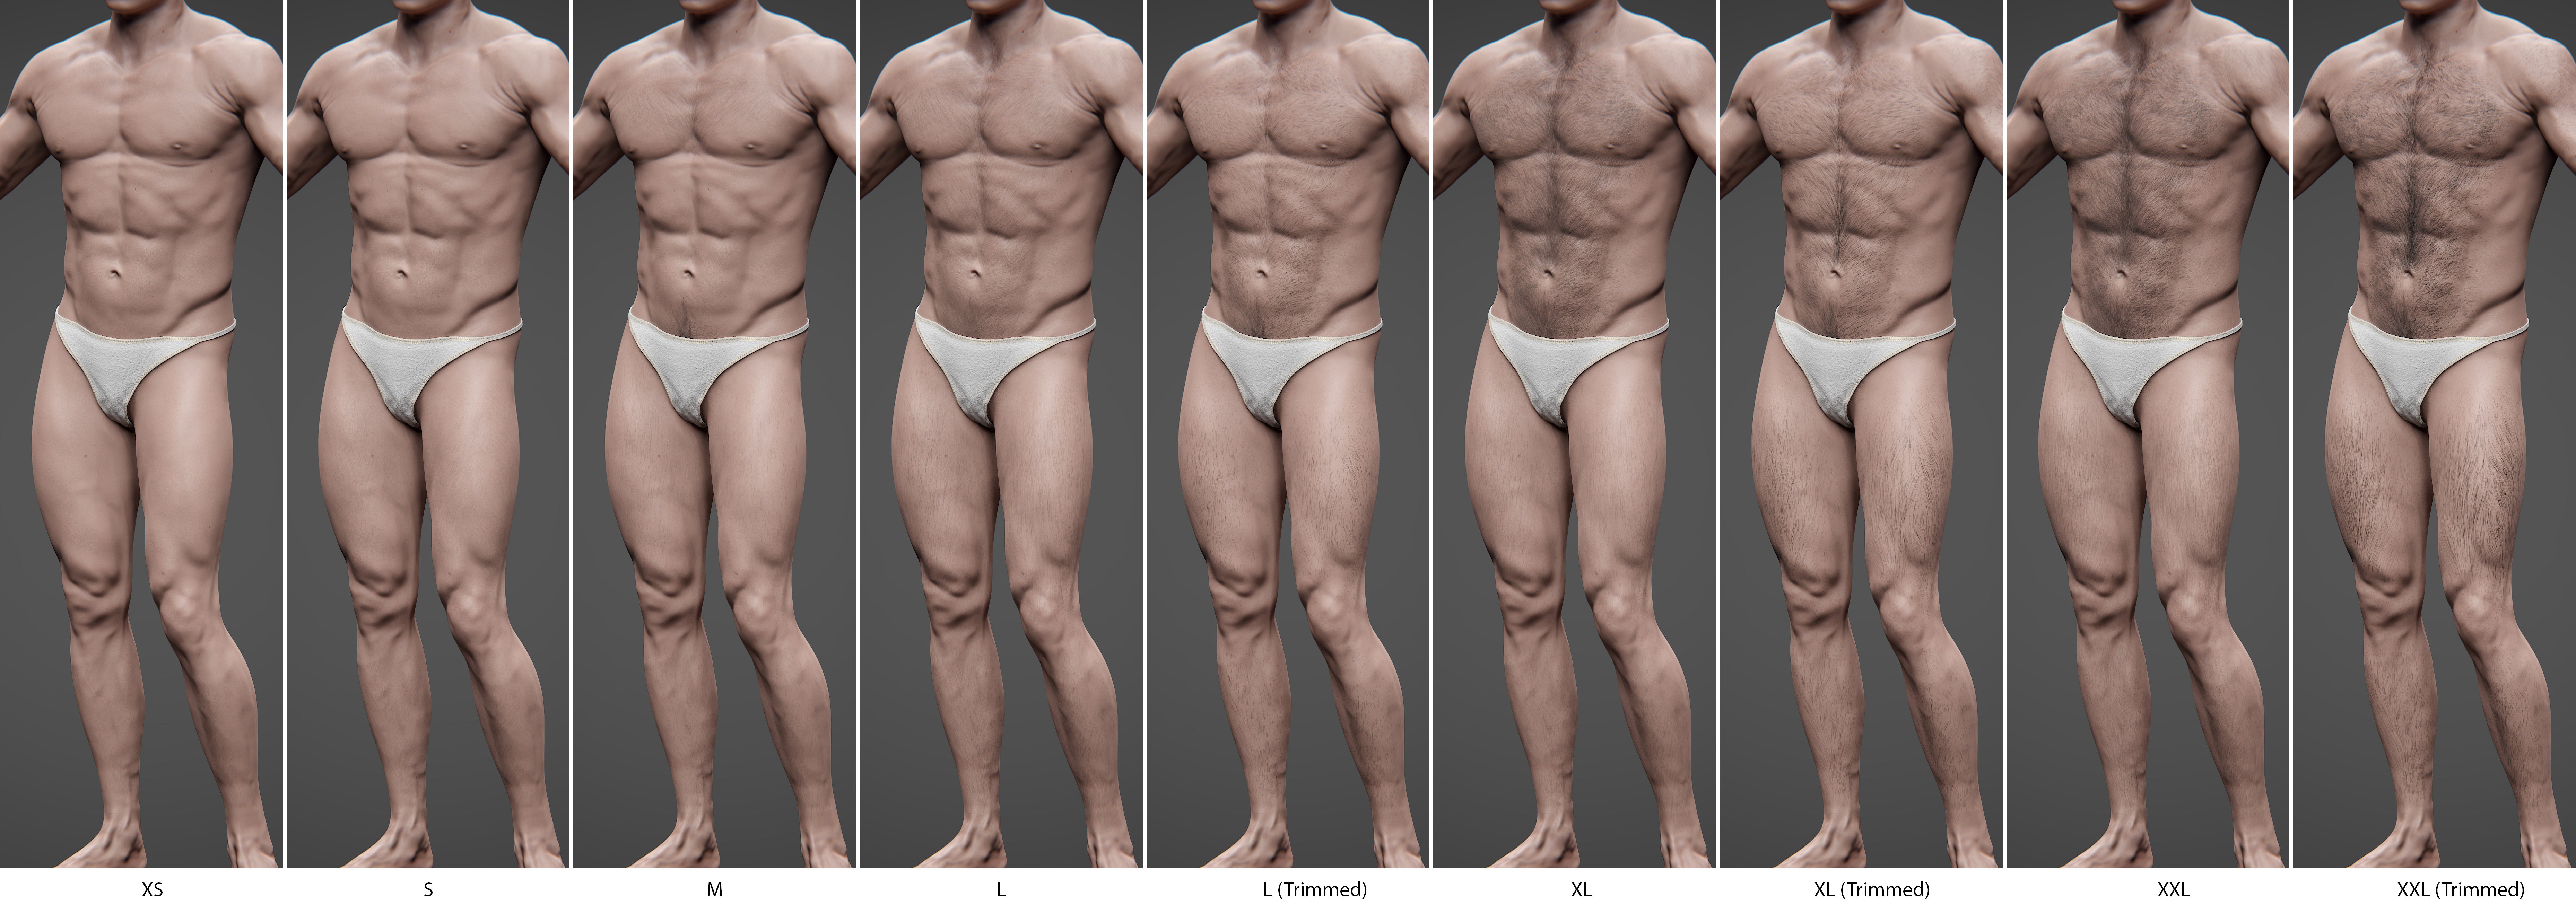
In the dropdown, there is a list of presets that range from XS to XXL, including a Trimmed version of L, XL, and XXL.
These textures can be further edited by increasing the Bump and the Thickness of the texture effect.
👌 TIP: Mixing texture based body hair with a small amount of mesh cards offers an incredibly realistic effect for those who need to export Transhuman or render in real-time!
Clothes
There is a Color Picker to change the color as well. All these option will be saved if you make a new Transhuman Preset, and are a great way of adding a touch of individuality to the character.
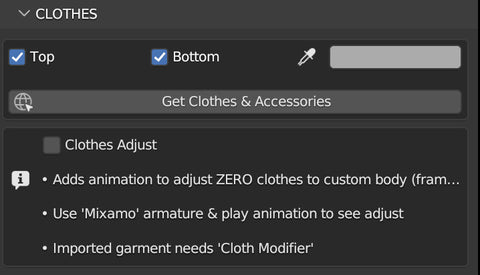
We have a catalogue of Clothes designed and tailored by our team available in our shop. The Get Clothes and Accessories button will direct you to our catalogue page.
Most of our garments are tailored using ZERO as a base.
If you import some clothes (the ones specifically design for ZERO in A-Pose), you can easily fit them to any other Transhuman by clicking the Clothes Adjust toggle.
This toggle activates a morph animation, that transforms the default ZERO into the final Transhuman shape of your choosing. The animations runs for 20 frames. If the imported clothes have a Cloth Modifier active, play the animation and the clothes should adjust to the new shapes.
Please bear in mind that this method is experimental and there will be areas of the cloth that need to be manually adjusted.
Once the animation is finished, save the Cloth Modifier as a Shape Key and using Sculpting tools, polish the garment until it looks perfect.
If everything went well, you should have your new Transhuman in T-Pose, clothed, and ready to be animated! 🎉
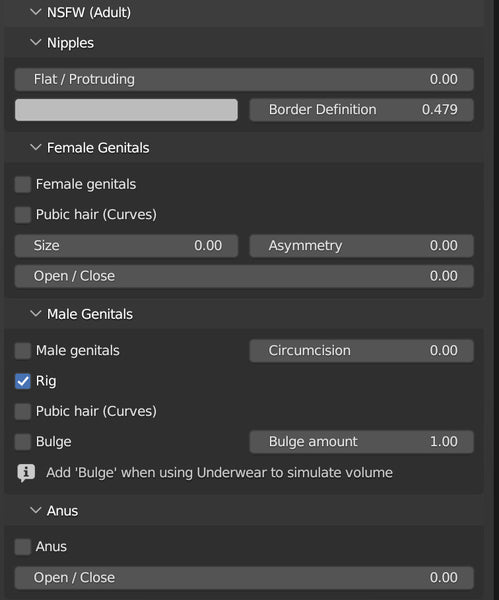
NSFW (Adult)
In the NSFW section there are options that are meant for adults only.
This section allows the artist to enable male and female genitals, and manipulate the nipples shape among other things.
There are explanations and samples in this page written by a collaborator (their opinions are their own and they do not represent us) 🙃
Troubleshooting
If Transhuman Renders pink in Eevee
Eevee has a limitation on the number of nodes that can be active in a given material. If Transhuman looks pink, it probably has too many nodes active. Try to preview it in Cycles to confirm if this is the case, or reduce the number of options that deal with the skin, such as body hair, scars, tattoos, age, or makeup.
If there are missing options in the panels
The plugin requires of all the nodes and names to be consistent and present in the file, and it can easily break if a name is modified, or an item is deleted.
If Transhuman ceases to work, make sure you didn't delete or rename any parts, or start a fresh scene and load a new Transhuman.
If Transhuman doesn't change appearance much when editing
It's easy to activate the BIND option and forget about it. If Transhuman doesn't change much despite edits, check that the modifier is off. There are times when the BIND/UNBIND button becomes desynchronized from the modifier panel, so you should check that it's unbounded there too.
If Finalize Hair / Body Hair fails when clicking the button
There are occasions when Finalize Hair fails to convert the hair to geometry and shows an error. This is because there are missing options in Blender's python that won't allow for a reliable programming of the feature. If the conversion fails, please try clicking Finalize Hair again. Also, try to click it with no objects selected. In most cases a second or third attempt will work.
What is the missing modifier "Add SQUISH Here"?
We recommend using the plugin for Blender "Squish- Instant Better Rig Deforms" by Xeofrios. If you are interested, please consider purchasing the plugin and selecting it in the designated empty Geometry nodes modifier. Our recommended settings are:

⚠️ Careful when rendering in Level 0. Squish will make the fingers look strange.
The Pose Assets won't work with Mixamo
The pose assets in the library are meant to be used with the IK/FK rig and won't work with Mixamo.
The nails don't look perfect when using Persona
We still haven't found a way to import the nail shape for each individual persona so it looks perfect each time. We will try to find a better method, but for now, we recommend disabling the nails in the viewport/render when using Persona, or creating a new shape key for the nails and using sculpting tools to adjust the nail to the best position. 💅
The Underwear / Eyebrows / Others explode or become out of place
The Underwear, the Tears, and the mesh Eyebrows all need a SurfaceDeform modifier to work properly. This modifier is very sensitive to mesh changes, and it will cease to work if the Transhuman has a lower or a higher number of vertices.
If your Underwear / Other is out of place, make sure you don't have the Simplify option enabled (limiting the subdivision of the meshes). Also make sure not to delete any object or to change any name.
If the file became corrupted, please create a new blender file and load a new Transhuman :)
📧 Have any other problems? Write to us and we'll update this list to include a solution for you!